Love the hatch grain leather. Beautiful!bcFour wrote: ↑Tue Oct 27, 2020 11:02 pm almost to the day, 2 years after returning from my time with Carreducker, I finished my 20th pair - and here it is.
I realize a Norwegian stitch isn't everyone's bag, but I personally really like the look and more importantly, it is what was asked for. I think it works well with the Horween hatch grain and the casual natural vibe of their destination down in Bend OR.
As discussed in other threads, I holed these from the outside before lasting. It resulted in very even stitches even at the toe and heel.
Back of the envelope - almost 700 feet of thread in this pair of shoes... yikes!
The Gallery
Re: The Gallery
Re: The Gallery
Beautiful split toe, the fudging and outsole stitching is perfect! Do you mind if I ask which model Pfaff you used? I have been looking at a few Pfaffs. People either seem to love them or are luke warm on them. To me they are the BMW of sewing machines! Lol
Thanks,
Alan
Thanks,
Alan
-
tjburr
- 5

- Posts: 261
- Joined: Sat Sep 19, 2009 9:00 am
- Full Name: Terry Burress
- Location: Fort Worth, Texas, USA
- Has Liked: 1 time
- Been Liked: 10 times
Re: The Gallery
Another great AGM.
Here are a few pictures.
Matt have a wonderful presentation of women's shoes at the Fort.
How about Brett and some cool shoe pieces
Here are a few pictures.
Matt have a wonderful presentation of women's shoes at the Fort.
How about Brett and some cool shoe pieces
You do not have the required permissions to view the files attached to this post.
-
tjburr
- 5
- Posts: 261
- Joined: Sat Sep 19, 2009 9:00 am
- Full Name: Terry Burress
- Location: Fort Worth, Texas, USA
- Has Liked: 1 time
- Been Liked: 10 times
Re: The Gallery
Some others were online so I did not get photos, though they were great.
Then some dinner.
Then some dinner.
You do not have the required permissions to view the files attached to this post.
-
nickb1
- 5
- Posts: 235
- Joined: Mon Apr 01, 2019 7:04 am
- Full Name: Nick Bardsley
- Location: Instagram 6am_shoemaker
- Has Liked: 48 times
- Been Liked: 56 times
Re: The Gallery
Just off the lasts. Ladies Chelsea boots with sewn bevelled waists, piped topline and Cuban heels. The uppers were made by Dominic Casey, West End shoe and boot maker. Plus some pics from the making, including rescue work on the heels. I didn't use a regular "shover" with a break up at the ankle on the (shoe) lasts, but the distortion you can see there (at the ankle break) probably comes from the fact that I had given Dominic the lasts for pattern making before I built up the cone to conform to the short and long heel measurements. Mea culpa. I think that largely will go away with wear. Other things to work on include the sole stitching, which is still quite uneven in parts. Somehow even if the welt marking looks fine I am still getting the odd large or tiny stich here and there, and parts where they jump around away from the line.
You do not have the required permissions to view the files attached to this post.
To each foot its own shoe.
Instagram
-
tjburr
- 5
- Posts: 261
- Joined: Sat Sep 19, 2009 9:00 am
- Full Name: Terry Burress
- Location: Fort Worth, Texas, USA
- Has Liked: 1 time
- Been Liked: 10 times
Re: The Gallery
I've been working on the shape of a 1400's style last. Still not totally happy but since I was going to England on vacation I made a pair to see how they felt roaming around castles. The toe is still a little tall and last shape in waist is a modern shape... Still a work in progress.
Cheated a little with a glue on sole since these we just mostly a fitter pair.
Cheated a little with a glue on sole since these we just mostly a fitter pair.
You do not have the required permissions to view the files attached to this post.
-
kemitchell
- 1

- Posts: 11
- Joined: Wed Mar 29, 2023 7:53 pm
- Full Name: Kyle Mitchell
- Location: Oakland, California, USA
- Has Liked: 13 times
- Been Liked: 6 times
- Contact:
Re: The Gallery
I recently finished my first pair of shoes, some hand-sewn, hand-welted, ankle-height work boots, at least far enough to take to the cobbler for edge and heel sanding:
I'm also keeping a webpage with notes, thanks, suppliers, and a big, long list of mistakes I made in the process. The biggest disappointment was building the toe up so ugly, then leaving too little lasting allowance over it. The biggest payoff was the fit. With long, skinny flippers 11½″ heel to toe and barely 10″ around the joints, I've never had shoes that gripped my heel and freed my toes free like these.
I'm sure there are mistakes there I don't yet see, in addition to the many I do. Very grateful for any pointers or tips from the Crispin Crew!
-
nickb1
- 5
- Posts: 235
- Joined: Mon Apr 01, 2019 7:04 am
- Full Name: Nick Bardsley
- Location: Instagram 6am_shoemaker
- Has Liked: 48 times
- Been Liked: 56 times
Re: The Gallery
Good effort. Lasting the toe can be tricky with thick leather plus stiffeners. helps if you skive down the stiffener at the feather edge after lasting the stiffener over. You'll find other tips for this if you dig into the threads here e.g. on "wiping the toe". As for the long list of mistakes, it's suggested here to focus on 3 just things to improve for next time ;-) Nick
To each foot its own shoe.
Instagram
-
kemitchell
- 1
- Posts: 11
- Joined: Wed Mar 29, 2023 7:53 pm
- Full Name: Kyle Mitchell
- Location: Oakland, California, USA
- Has Liked: 13 times
- Been Liked: 6 times
- Contact:
Re: The Gallery
Thanks, nickb1! I appreciate the kind words.
I'm keeping an ever-growing list of questions about shoemaking, too. There's already one there about lasting toes with wire, like I've seen several Mexican western/cowboy boot makers do. But that's definitely to ponder another day.
I'm keeping an ever-growing list of questions about shoemaking, too. There's already one there about lasting toes with wire, like I've seen several Mexican western/cowboy boot makers do. But that's definitely to ponder another day.
-
carsten
- 4

- Posts: 157
- Joined: Wed Nov 06, 2019 2:24 am
- Full Name: Carsten Metz
- Has Liked: 5 times
- Been Liked: 51 times
Re: The Gallery
Making the leather damp will also help to get a nice toe in case of a thicker upper leather -but more importantly the "wiping the toe" as Nick points out, will give good results. As far as I understand the wire lasting will work for the norvegian / double stitched construction but not for the classic welted construction. I agree with Nick on the list of mistakes. Don't be to hard on yourself and improve step by step.
-
kemitchell
- 1
- Posts: 11
- Joined: Wed Mar 29, 2023 7:53 pm
- Full Name: Kyle Mitchell
- Location: Oakland, California, USA
- Has Liked: 13 times
- Been Liked: 6 times
- Contact:
Re: The Gallery
Thanks, Carsten.
I may have given the wrong impression from my list of mistakes. I'm not browbeating myself at all. Just leaving notes for myself, later. I do tend to get a little disappointed when I make the same mistakes again.
I may have given the wrong impression from my list of mistakes. I'm not browbeating myself at all. Just leaving notes for myself, later. I do tend to get a little disappointed when I make the same mistakes again.
-
das
- Seanchaidh
- Posts: 1640
- Joined: Wed Apr 26, 2000 9:00 am
- Full Name: D.A. Saguto--HCC
- Has Liked: 157 times
- Been Liked: 142 times
Re: The Gallery
While wire will work for "chasing wrinkles" at the toe, for welted work we often use a "toe wiper" in exactly the same way as the wire is used: take a 1/4" wide x 4"-5" long strip of strong uppers weight leather, wet it and pre-stretch it between two lasting pincers. After the vamp is lasted as smooth as you can get it, tack (2 tacks) one end of this strip securely amongst your lasting tacks maybe 2" off to the left of the center of the toe. Lay the strip outside of your lasting tacks right on top of the offending wrinkles. Grab the free end with lasting pincers and pull as hard as you dare around the toe and quickly secure the other end of the strip, likewise, ~2" to the right of the center toe and tack it securely. Then, with the pane of your hammer tap the "toe wiper" strip down as flat as you can to flatten the wrinkles underneath.
-
carsten
- 4
- Posts: 157
- Joined: Wed Nov 06, 2019 2:24 am
- Full Name: Carsten Metz
- Has Liked: 5 times
- Been Liked: 51 times
Re: The Gallery
On my recent trip to Turkey I saw some traditional Ottoman-shoes. The shoes are flat and according to the maker (Ali Bayar, Selcuk close to ancient Ephesus) the upper is a veg tanned upper and the lining is made of goat leather. Only the heel has a stiffener. As I did not come across a similar bottom work, I thought it might be interesting to post a picture of the shoe here.
Here the sole is sewn directly on the shoe by hand - perhaps a little comparable to blake stitching. Except that the seam serves at the same time as a decorative stitching on the side of the sole.
I guess the shoes are sewn by pushing the curved awl into the side of the sole such that it exits the insole. This way the bottom of the sole stays entirely intact.
Not sure though if the visible thread might wear off quicker this way as it is more exposed than a normal inseam / blake stich.
You do not have the required permissions to view the files attached to this post.
-
das
- Seanchaidh
- Posts: 1640
- Joined: Wed Apr 26, 2000 9:00 am
- Full Name: D.A. Saguto--HCC
- Has Liked: 157 times
- Been Liked: 142 times
Re: The Gallery
That's a new one on me construction wise, but makes perfect sense for durability/protecting the thread.
-
kemitchell
- 1
- Posts: 11
- Joined: Wed Mar 29, 2023 7:53 pm
- Full Name: Kyle Mitchell
- Location: Oakland, California, USA
- Has Liked: 13 times
- Been Liked: 6 times
- Contact:
Re: The Gallery
Any idea about the outsole leather?
It is always hard to tell from pictures, but it looks soft to me. I can imagine that would make those curved stitches easier.
-
carsten
- 4
- Posts: 157
- Joined: Wed Nov 06, 2019 2:24 am
- Full Name: Carsten Metz
- Has Liked: 5 times
- Been Liked: 51 times
Re: The Gallery
@kemitchell . Well, he said it's veg tanned as well, but its actually only a little softer than normal outsoles.
Speaking of it he also sells a version in which the sole tapers down to a point at the toe and rolls up building kind a very small toe box. Didn't take a picture of it though...
Speaking of it he also sells a version in which the sole tapers down to a point at the toe and rolls up building kind a very small toe box. Didn't take a picture of it though...
-
Sservak
- Posts: 2
- Joined: Fri Feb 17, 2023 6:13 am
- Full Name: Barber John
- Has Liked: 2 times
- Been Liked: 5 times
Re: The Gallery
Greetings, long ago i found about D.W. Frommer work, i was amazed by his crimping work, full vellington cuts and full pegged soles. Unfortunately i've never met him or even speaked to him, but in my eyes he became my mentor. There was special bootmaking technique in my country, nowadays forgotten and lost. I'm talking about high boots, jackboots or "sapogi" as we call them here. The point of this technique to crimp a whole cut of a jackboot and then sew with only one back seam. Inner lining of top and vamp whipped stitched. There is no seams and stitches besides heel counter (but you can whip stitched them too) therefore sapogi came out nearly waterproof. They called "вытяжные" wich roughly can be translated as "stretched-out". So, i've got inspired by DWF and my ancestors and made this pair. Sorry for my bad english, i'm from russia and must say that i never supported my government...
Top leather chrome and veg tanned, 2.0-2.2mm, i infuse it with birch tar, beeswax and beef fat, all natural. Soles, heels, counter veg tan 3.4-5.0mm. Full pegged soles with birch pegs. I hope you find my work interesting, btw i really appreciate Lisa Sorrell and Lee Miller videos, i can't describe how helpful they are.
Top leather chrome and veg tanned, 2.0-2.2mm, i infuse it with birch tar, beeswax and beef fat, all natural. Soles, heels, counter veg tan 3.4-5.0mm. Full pegged soles with birch pegs. I hope you find my work interesting, btw i really appreciate Lisa Sorrell and Lee Miller videos, i can't describe how helpful they are.
You do not have the required permissions to view the files attached to this post.
-
Sservak
- Posts: 2
- Joined: Fri Feb 17, 2023 6:13 am
- Full Name: Barber John
- Has Liked: 2 times
- Been Liked: 5 times
Re: The Gallery
And a little bit more
You do not have the required permissions to view the files attached to this post.
-
carsten
- 4
- Posts: 157
- Joined: Wed Nov 06, 2019 2:24 am
- Full Name: Carsten Metz
- Has Liked: 5 times
- Been Liked: 51 times
Re: The Gallery
Very nice work @kemitchell . How is the fit? Every year I want to start a pair of boots but never found the time for it. I always wonder if the heel part needs to be a bit more curved in order to grab the heel snugly so that there is no slipping?
-
das
- Seanchaidh
- Posts: 1640
- Joined: Wed Apr 26, 2000 9:00 am
- Full Name: D.A. Saguto--HCC
- Has Liked: 157 times
- Been Liked: 142 times
Re: The Gallery
Sservak, magnificent boots! I have always been intrigued by whole-cut boots, and daunted by them. I have made many with whole fronts and side seams, but had always hoped to find some like yours, high with only a back seam. I'm glad to know these are a traditional Russian style the making of which is being preserved. History and archaeology tell us that whole-cut boots of all types originated in the East, and were adopted centuries ago by the western Europeans, like many fashions from "Muscovy", as "exotic" styles.
-
carsten
- 4
- Posts: 157
- Joined: Wed Nov 06, 2019 2:24 am
- Full Name: Carsten Metz
- Has Liked: 5 times
- Been Liked: 51 times
Re: The Gallery
So sorry @Sservak , I just realized that I had tried to comment on your boots and ask about their heel section but somehow got the reference wrong. Can't seem to edit that post anymore now.
Fantastic work! How did you do the crimping? Recently I tried to do the same with some crimping clamps that I got from China. Unfortunately they were not strong enough so their spindles bent under the strong pull that is required for the leather I was using.
Fantastic work! How did you do the crimping? Recently I tried to do the same with some crimping clamps that I got from China. Unfortunately they were not strong enough so their spindles bent under the strong pull that is required for the leather I was using.
-
Kfd518
- Posts: 2
- Joined: Sat Jan 25, 2025 8:04 am
- Full Name: Dale Oaks
- Has Liked: 1 time
- Been Liked: 2 times
Re: The Gallery
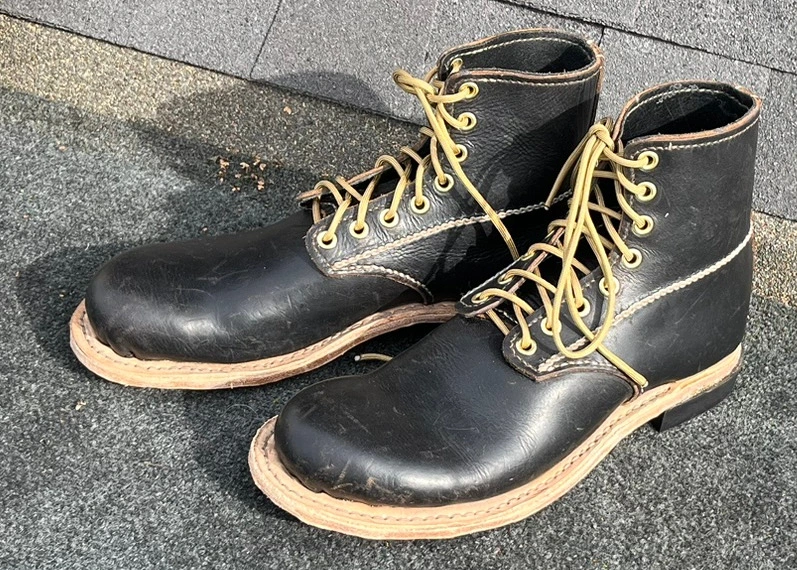
Firstly, this forum has been a wealth of knowledge. There is so much to learn from all the information here. These are my second pair of boots.
Sorry for the dirty condition of these, they are my daily wear boots. Some have probably already seen these in another forum. Most of my supplies were bought from @sorrell , she has been more than helpful in my learning process. I have a LONG way to go and even more to learn but I’m glad I have taken this dive. At this point I am trying to learn more on fitting the foot and building up the last which has been my biggest fear in chasing this rabbit hole.
Sorry for the dirty condition of these, they are my daily wear boots. Some have probably already seen these in another forum. Most of my supplies were bought from @sorrell , she has been more than helpful in my learning process. I have a LONG way to go and even more to learn but I’m glad I have taken this dive. At this point I am trying to learn more on fitting the foot and building up the last which has been my biggest fear in chasing this rabbit hole.
You do not have the required permissions to view the files attached to this post.
-
tjburr
- 5
- Posts: 261
- Joined: Sat Sep 19, 2009 9:00 am
- Full Name: Terry Burress
- Location: Fort Worth, Texas, USA
- Has Liked: 1 time
- Been Liked: 10 times
Re: The Gallery
Dale,
Welcome to the forum. I also get lots of my supplies from @sorrell. It helps that her shop is 4 hours away and close to where my son is going to college.
I'm glad the forum has been of help. It looks like the leather you used in the boots was fairly heavy which can make it more of a challenge.
I was curious what the piece of leather is on the outside of the left boot near the top, is it a label or does it have a purpose...it is not very visible in the pictures.
Do you know which last model you used for the boots? Is there something in specific you could use some help on with building up the last? If you have some questions you can post them in the open forum->Techniques, Crans and visualizations forums. I don't have the years of experience that others have but will be willing to help and I'm sure others will jump in as well.
Note: one of the challenges I had early on was getting my toes to look the same on both lasts. This is something that is real visible and helps to get it correct. You can use a "contour gauge", available from woodworking places as well as @sorrell. You can use the guage in both directions both across and in line with the last. You can use the contour across the toe at several distances, measure to get the distances correct, as well as the contour in line with the last, like getting the shape of the front of the toe. And of course you can trace the bottom of the last in the toe to get the shape. If one foot is wider it still helps to adjust the point/roundness of the toes to attempt a match.
Terry, your friendly admin.
-
Kfd518
- Posts: 2
- Joined: Sat Jan 25, 2025 8:04 am
- Full Name: Dale Oaks
- Has Liked: 1 time
- Been Liked: 2 times
Re: The Gallery
Tj,
I used 6-7 oz chrome excel on these with 2-3 oz Vermont horsehide lining, 5 oz toe box and 12 oz counter. The thicker leather is tougher to get smooth in the toe and heel but some of that is technique that I’m learning as I make more boots. The goal with what I want to specialize in is a hand welted version of PNW style heavy duty work boots / possibly wild land fire boots for those who prefer hand welted to stitch down, none of which will last long in thinner leathers with the abuse that customers wishing for these types of boots will dish out. I also would like to try to get rid of nails in them but not sure how well that is going to pan out.
The patch of leather is a piece of veg tan with my maker stamp on it sewn on, to identify the maker so yes a label of sorts. The CXL won’t take the stamp and hold it so that was my solution.
simply don’t have any experience in fitting the last. Knowing where the volume is needed without having a pedigraph.
I believe I will start doing as I have seen one boot maker do with taking a tracing of the top of the foot and using the contour gauge across the toes and joint.
Lisa has been very helpful in pointers and tips. I had the opportunity years ago to have my old boot maker in Mason, Texas teach me. However, I had/have a full time job with my FD and was not able to take the time off to do so. Now I have a family and am not currently able to do any long term training do to the ages of my children. I will get it down it will just take time. I am doing work for some good friends and family that will give me honest feedback and have some “odd feet” in order to help me learn the sizing.
Thank you for the tips on matching the toes. Not so worried about that on my personal boots since they fit well but other might not be so inclined to have oddball toes.