hello everyone!
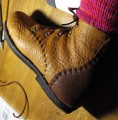
these are my third pair of shoes.
I sewed everything by hand (which is struggling welt sewing uppers and soles!).
I used to welt leather sole 3/4 mm but I was wrong, then turn on the midsole has been very difficult. It would have been better to use softer leather.
The seam that connects the upper and sole welt is all wrong, when I made the holes on the sole, before starting lasting, I could not do them all at the same height.
I think the most difficult passage. Is there any way to make this transition easier? I think a lot depends on the fact that I have very poor with an awl tip to screw on the handle. But I do not know where to buy these tools a little more professional than mine.
I wanted to put as a lug Vibram soles, but after the mid-sole stitched to the welt I realized that the tanks on the market were not large enough at the waist of the shoe.
I decided to do it all in leather and put the nails that we call "brocche."
What do you think?
I realize it does not compare to the quality of the shoes I see in this wonderful site.
But is only my third attempt and my only guide is the book of tim and this site.
But I think these shoes will have long life because I seem to have done everything to make them resistant, which is also the most important thing!
thanks for your attention
greetings
Simon
The Gallery
-
simon_brusa
- 1

- Posts: 21
- Joined: Sun Mar 18, 2012 3:15 pm
- Full Name: Simone Brusa
- Location: Busalla, Genova, Italy
-
paul
- 8

- Posts: 1038
- Joined: Tue Mar 08, 2005 10:00 am
- Full Name: Paul Krause
- Location: Prescott, Arizona, USA
- Been Liked: 14 times
- Contact:
Re: The Gallery
It has been a long time since I posted anything, 'cause of Facebook, I suppose. That and being busy. I year ago I moved my shop back into town, and then my helper left after 3 1/2 months. Being located in a downtown location is no place for a one man operation. Sure hope it changes this year. Don't know how long I can keep it up.
Enough of the snivel.
ANyway, I wanted to share pictures of my latest pair.
Black and tan french calf full cuts, with milled veg tanned filigreed collars.
I call them Black and Tan - My Tribute to Beer.
Regards,
Paul
Enough of the snivel.
ANyway, I wanted to share pictures of my latest pair.
Black and tan french calf full cuts, with milled veg tanned filigreed collars.
I call them Black and Tan - My Tribute to Beer.
Regards,
Paul
You do not have the required permissions to view the files attached to this post.
-
dearbone

- 8
- Posts: 1032
- Joined: Fri Oct 12, 2007 12:23 pm
- Full Name: Nasser Vies
- Location: Toronto, Ontario, Canada
- Been Liked: 3 times
Re: The Gallery
A pair of wingtip in calf and the some pebble grain leather.
The ankle boots are in French calf and pebble grain,the lasts are some factory made i bought many years ago for cheap and have been modifying them.
The ankle boots are in French calf and pebble grain,the lasts are some factory made i bought many years ago for cheap and have been modifying them.
You do not have the required permissions to view the files attached to this post.
-
lancepryor
- 7

- Posts: 662
- Joined: Wed Mar 31, 2004 6:42 am
- Full Name: lance pryor
- Been Liked: 6 times
Re: The Gallery
Here is my first pair of loafers. These were made on a pair of lasts I made in a visit with Terry Moore in the UK.
The apron is hand-sewn with a lift-and-split stitch (called by Edward Green a 'skin stitch'), and the toe seam is round closed on the flesh side. These seams were sewn with a boar's hair bristle.
The outsoles were hand sewn at 10 spi and feature a beveled waist.
I enjoyed making this pair, even though I had to figure out how to do some things as I went along, particularly in the closing of the uppers.
Lance
You do not have the required permissions to view the files attached to this post.
-
romango

- 8
- Posts: 854
- Joined: Wed Apr 18, 2007 1:40 pm
- Full Name: Rick Roman
- Location: Eugene, Oregon, USA
- Been Liked: 8 times
- Contact:
Re: The Gallery
Some new dance shoes. I had a little fun with the bottom finish
You do not have the required permissions to view the files attached to this post.
-
dw

- Seanchaidh
- Posts: 5830
- Joined: Wed Jan 01, 1997 10:00 am
- Full Name: DWFII
- Location: Redmond, OR
- Has Liked: 204 times
- Been Liked: 125 times
- Contact:
Re: The Gallery
Finaly finished my first pair of chelseas. It was a long process...I modified/made patterns made boards, and built these out of some scrap leather. Nothing real difficult but I had other work to get out.
Still a few bugs but proof of concept. They might be a little too far down on the last at the back. Should have straightened the heel curve on the last a bit. Don't know if the elastic is wide enough, might have to move the front line forward a tidge.
Whole cut chelseas, one inch heel, round/square toe nameless calf. Liner is seamed at sides to reinforce backseam. Backpart line one piece.
Tight Stitches
DWFII--HCC Member
[center]Little Jack Dandiprat in a white petticoat,
The longer he lives, the shorter he grows.[/center]
You do not have the required permissions to view the files attached to this post.
-
athan_chilton
- 4

- Posts: 163
- Joined: Sun May 17, 2009 7:03 am
- Full Name: Athan Chilton
- Location: Urbana, IL, USA
Re: The Gallery
Three months and most every mistake a beginning bootmaker can accomplish. Including some I haven't made before--that must indicate progress
 They are made with "practice" leather (too soft), sewn on my post machine that doesn't make really small stitches. Fancy pattern is DW's. Handsewn welt, side seams, and outsole. Still need to make a welt tickler, so no pretty marks on the welt...
 I'm thinking there might be some kind of stitcher in my future, for those side seams and outsoles. Doing those things by hand only increases my respect for anybody who does it by hand and makes it look beautiful as well as making it strong.
You do not have the required permissions to view the files attached to this post.
-
sir_simon_eyre
- Posts: 3
- Joined: Sun Aug 19, 2012 11:15 pm
- Full Name: Rusty Moore
- Location: Pembroke, MA, USA
- Has Liked: 1 time
Re: The Gallery
Greetings, fellow cordiners. Al asked me if I would post the link to a set of photos I recently put on Flickr, pictures of an example of the 17th-century repro shoes I made at Plimoth Plantation between '96 and '01. Following the shoe pics are some of my kit and some measured drawings I did of archaeological pieces and shoes in various museum collections. If there's a better discussion thread for this, feel free to move it. http://flic.kr/s/aHsjz64RXY
-
romango
- 8
- Posts: 854
- Joined: Wed Apr 18, 2007 1:40 pm
- Full Name: Rick Roman
- Location: Eugene, Oregon, USA
- Been Liked: 8 times
- Contact:
Re: The Gallery
My latest Oxfords.
Blue burnishable buffalo from GN. Black airbrush highlights and 'sealed' with blue shoe polish.
Blue burnishable buffalo from GN. Black airbrush highlights and 'sealed' with blue shoe polish.
You do not have the required permissions to view the files attached to this post.
-
dearbone
- 8
- Posts: 1032
- Joined: Fri Oct 12, 2007 12:23 pm
- Full Name: Nasser Vies
- Location: Toronto, Ontario, Canada
- Been Liked: 3 times
Re: The Gallery
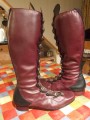
Here is a pair of long work I am asked to make once a while,This one is in calf leather and fully hand welted,good enough for many Canadian winters.
You do not have the required permissions to view the files attached to this post.
-
paige_marie_sorrell
- Posts: 1
- Joined: Wed Aug 22, 2012 12:34 pm
- Full Name: Paige Marie Sorrell
- Location: Guthrie, Oklahoma, United States of America
- Contact:
Re: The Gallery
These are a pair of women's shoes I just finished! I used kid leather and a cement construction.
Paige Sorrell
Paige Sorrell
You do not have the required permissions to view the files attached to this post.
-
dw
- Seanchaidh
- Posts: 5830
- Joined: Wed Jan 01, 1997 10:00 am
- Full Name: DWFII
- Location: Redmond, OR
- Has Liked: 204 times
- Been Liked: 125 times
- Contact:
Re: The Gallery
Keeping the foto-fest going...first pair of suede full wellingtons. actually first pair of suede anything. I don't get much in the way of requests or even inquiries about suede but until I discovered the shrink wrap technique I would have been reluctant. Esp.with a close-trimmed full pegged outsole--not a drop of ink or wax on the uppers after finishing.
This is actually Hochauser French calf reversed but I do have a source for good English full grain calf suede here in the US.
Tight Stitches
DWFII--HCC Member
(Message edited by dw on August 25, 2012)
This is actually Hochauser French calf reversed but I do have a source for good English full grain calf suede here in the US.
Tight Stitches
DWFII--HCC Member
(Message edited by dw on August 25, 2012)
You do not have the required permissions to view the files attached to this post.

-
tjburr
- 5

- Posts: 261
- Joined: Sat Sep 19, 2009 9:00 am
- Full Name: Terry Burress
- Location: Fort Worth, Texas, USA
- Has Liked: 1 time
- Been Liked: 10 times
Re: The Gallery
It has taken me some months, but I finally completed the pegged shoes I was working on.
It was a wonderful experience since I had never pegged before, and this gave me much practice.
I chose to make the upper very simple, which was a mistake. This was to be a trial pair for pegging and I decided to work some on the edge and sole finishing; my chosen three things to improve.
After spending so much time on the soles, I wish I had chosen to make a better upper, chosen better leather for the upper, and chosen cleaner/higher quality soling. I was planning on just using up some old leather I had laying around, but for all the time I put into the soles it would have been better to use the better leather.
I was also fairly happy with the results of the edge iron I made a few months back. I obtained the look I wanted, though I need to look closer at examples to see if I came close to the correct effect.
I tried to give the edge of the sole an "antiqued" look, using a darker stain with a lighter colored wax on top. I think it looks ok, but if you look real close you can see some blotchy-ness; not sure how to get the proper effect. I was trying for a look that went well with the vamp leather (oil tanned distressed leather).
I definitely like the advice to look for three things to correct next time, since I can find many things and I can see how focusing on three would be best.
I also tried to get creative in the photo, using some shadows...I have not decided if I like the effect yet. Someone needs to write a book on taking shoe pictures! I will be practicing some more photos before taking these out on the cement.
Sorry about the long post.
Terry
You do not have the required permissions to view the files attached to this post.
-
jshepherd
- Posts: 8
- Joined: Fri Apr 02, 2010 9:00 am
- Full Name: John Shepherd
- Location: Nanaimo, BC, Canada
Re: The Gallery
Hi,
While we are on the topic of suede, here is a pair of desert boots I finished last week. The lining, counter, and toe puff are lasted under. The upper is folded out after lasting, and stitched down with a Frobana machine.
John
\image
\image
While we are on the topic of suede, here is a pair of desert boots I finished last week. The lining, counter, and toe puff are lasted under. The upper is folded out after lasting, and stitched down with a Frobana machine.
John
\image
\image
-
jshepherd
- Posts: 8
- Joined: Fri Apr 02, 2010 9:00 am
- Full Name: John Shepherd
- Location: Nanaimo, BC, Canada
Re: The Gallery
While we are on the topic of suede, here is a pair of desert boots I finished last week. The lining, counter, and toe puff are lasted under. The upper is folded out after lasting, and stitched down with a Frobana machine.
John
John
You do not have the required permissions to view the files attached to this post.
-
idris_nowell
- 1
- Posts: 21
- Joined: Thu Sep 01, 2011 1:06 am
- Full Name: Idris Nowell
- Location: Swansea, Wales, United Kingdom
- Contact:
Re: The Gallery
Now for something a little different...
These are the first pair of shoes I've managed to make for myself, as such they're quite experimental.
I wanted to see how well I could make a trainer type shoe using traditional techniques and without a unit sole.
The upper is nubuck, wholecut, with a veg tan lining and beaded topline. The opening goes very low onto the "vamp" in the style of a trainer or hiking boot.
The sole is where things get more interesting. I used a leather midsole followed by microcellular rubber to build up the heel. I then used masking tape to create a pattern for the first layer of rubber and repeated for the second and third. The problem with using sheet rubber is that while you can stretch it by heating it it won't compress at all and so avoiding wrinkles was very difficult, particularly since in essence what you see wrapped around the upper is the lasted edge. In fact I had to add the third layer (at the heel) at the last minuet to hide a wrinkle that I'd cut off. Finally I sewed around all the exposed edges of the rubber using the guitar string technique.
As a proof of concept they aren't as neat as I would like but I am very pleased with how the sole has turned out. In the future I'd like to try using a vacuum moulding machine to form a flat rubber sheet around the lasted shoe and then cut the sole pattern out of that.
Idris
(Message edited by Idris Nowell on September 02, 2012)
-
idris_nowell
- 1
- Posts: 21
- Joined: Thu Sep 01, 2011 1:06 am
- Full Name: Idris Nowell
- Location: Swansea, Wales, United Kingdom
- Contact:
Re: The Gallery
Whoops, I tried to post the full size images, I'll try again...
You do not have the required permissions to view the files attached to this post.
-
marleneg
- 1
- Posts: 14
- Joined: Sat Mar 26, 2011 2:26 pm
- Full Name: Susanne Schmidt Luebke
- Location: Dortmund, Germany
Re: The Gallery
Some pictures of my recently made ballerinas. Unfortunately I made the vamp a little to short so now they show lots of toe cleavage which wasnt intended. I love low cut ballerinas but I guess they were a little to much....
(photos deleted by Admin...reason: too large)
(Message edited by admin on September 03, 2012)
(photos deleted by Admin...reason: too large)
(Message edited by admin on September 03, 2012)
-
marleneg
- 1
- Posts: 14
- Joined: Sat Mar 26, 2011 2:26 pm
- Full Name: Susanne Schmidt Luebke
- Location: Dortmund, Germany
Re: The Gallery
here are the pics in a smaller resolution, sorry
You do not have the required permissions to view the files attached to this post.
-
eric_e
Re: The Gallery
First pair of shoes on my own after taking Bill Shanor's class last year and practicing a bit.
/image{0545}
/image{0549}
/image{0560}
/image{0592}
/image{0545}
/image{0549}
/image{0560}
/image{0592}
-
eric_e
Re: The Gallery
First pair of shoes after taking a class last year.
You do not have the required permissions to view the files attached to this post.
-
luckyduck
Re: The Gallery
It seems time for some western boots.
Gray and charcoal buffalo from Garlin Newman. It was rather stiff to work with, but the colors matched what the cusomer wanted.
Gray and charcoal buffalo from Garlin Newman. It was rather stiff to work with, but the colors matched what the cusomer wanted.
You do not have the required permissions to view the files attached to this post.
-
romango
- 8
- Posts: 854
- Joined: Wed Apr 18, 2007 1:40 pm
- Full Name: Rick Roman
- Location: Eugene, Oregon, USA
- Been Liked: 8 times
- Contact:
Re: The Gallery
Suede crocodile Derbys. Leather from Roje Exotic Leather.
(Message edited by romango on September 21, 2012)
(Message edited by romango on September 21, 2012)
You do not have the required permissions to view the files attached to this post.
-
jon_g

- 5
- Posts: 207
- Joined: Wed Feb 18, 2009 10:46 am
- Full Name: Jon Gray
- Location: Annapolis Royal, Nova Scotia, Canada
- Been Liked: 1 time
- Contact:
Re: The Gallery
There's been some nice work posted here and I've been meaning to get in on the gallery for a while now, going back as far as DW's chelseas (which I really like, and I hope you will eventually share some of their secrets).
You do not have the required permissions to view the files attached to this post.