DW,
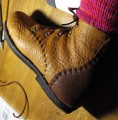
Gotcha. I have seen shoes with the stitching on the outsole exposed though. I think possibly their chukka boots on that website for example (can't remember). Is there any reasoning for that beyond aesthetics? As a matter of fact, I am pretty sure my cowboy boots have exposed stitching on the outsole. Again, I am a complete noob, so I am sure I am asking things that are completely obvious to most of you. Here is an example.
Outsoles
-
kevindeleon

- 1

- Posts: 19
- Joined: Mon Jan 02, 2012 10:33 pm
- Full Name: Kevin deLeon
- Location: New Orleans, LA, US
- Contact:
-
dw

- Seanchaidh
- Posts: 5830
- Joined: Wed Jan 01, 1997 10:00 am
- Full Name: DWFII
- Location: Redmond, OR
- Has Liked: 204 times
- Been Liked: 125 times
- Contact:
Re: Outsoles
Kevin,
That looks to be a grooved outsole. It is, IMO, not significantly better than stitching aloft. The threads are exposed to grit and moisture and I believe it significantly and adversely impacts the life of the seam and the outsole.
A well done channel cut in, and a deepening angle, from the edge of the outsole is the best solution to protecting the stitching. A vertical channel if closed properly and perhaps even glued shut is close behind but not as aesthetically pleasing as the angled channel.
A horizontal channel cut in from the edge of the insole can be pretty good for protecting the threads depending on how deep the channel is cut. But if it is not cut very deep it quickly becomes ragged and is almost more of an eyesore than any other method.
Tight Stitches
DWFII--HCC Member
[center]Little Jack Dandiprat in a white petticoat,
The longer he lives, the shorter he grows.[/center]
-
homeboy

- 6

- Posts: 410
- Joined: Mon Jan 21, 2008 10:00 am
- Full Name: Jake Dobbins
- Location: Mountain View, AR
- Has Liked: 111 times
- Been Liked: 30 times
Re: Outsoles
Nasser,
I'll get some to ya Partner! I think I still have your mailing address. Enjoy!
Jon,
Thanks! I appreciate it! You know, I think I WILL stick to it. I enjoyed not "bellying" up to those darn machines!
I'll get some to ya Partner! I think I still have your mailing address. Enjoy!
Jon,
Thanks! I appreciate it! You know, I think I WILL stick to it. I enjoyed not "bellying" up to those darn machines!
-
dearbone

- 8

- Posts: 1032
- Joined: Fri Oct 12, 2007 12:23 pm
- Full Name: Nasser Vies
- Location: Toronto, Ontario, Canada
- Been Liked: 3 times
Re: Outsoles
Jake,
I am very grateful to hear that, you are a good soul,you "Made My Day", so to say,how i can i repay you ,you let me know, i have plenty of natural linen #8 for exchange if agreeable, it is a little lighter in color than the hemp thread but has the sparkles of the silk thread on welts.Thanks again.
Nasser
-
homeboy
- 6
- Posts: 410
- Joined: Mon Jan 21, 2008 10:00 am
- Full Name: Jake Dobbins
- Location: Mountain View, AR
- Has Liked: 111 times
- Been Liked: 30 times
Re: Outsoles
Nasser,
No pay necessary! Just keep posting those "button" boots. Very elegant! I just love studying them.
Take care!
No pay necessary! Just keep posting those "button" boots. Very elegant! I just love studying them.
Take care!
-
dw
- Seanchaidh
- Posts: 5830
- Joined: Wed Jan 01, 1997 10:00 am
- Full Name: DWFII
- Location: Redmond, OR
- Has Liked: 204 times
- Been Liked: 125 times
- Contact:
Re: Outsoles
I thought I would share a couple of photos I ran across on another forum.
These are photos of pinwork on vintage balmoral boots made in the 1920's. The work was entered in a shoe repair competition....
I wish I knew where to get the pins for this work.
Tight Stitches
DWFII--HCC Member
[center]Little Jack Dandiprat in a white petticoat,
The longer he lives, the shorter he grows.[/center]
You do not have the required permissions to view the files attached to this post.
-
paul
- 8
- Posts: 1038
- Joined: Tue Mar 08, 2005 10:00 am
- Full Name: Paul Krause
- Location: Prescott, Arizona, USA
- Been Liked: 14 times
- Contact:
Re: Outsoles
What a charming display!
Was that a US s/r competition?
I'm not big on tooled sole bottoms, but this is beautiful.
Thanks for putting it up.
Was that a US s/r competition?
I'm not big on tooled sole bottoms, but this is beautiful.
Thanks for putting it up.
-
elfn
- 3

- Posts: 132
- Joined: Tue Mar 01, 2011 10:00 am
- Full Name: Nori Lamphere
- Location: Onalaska, WA, USA
- Contact:
Re: Outsoles
It looks like dye was used as well. The end result is beautiful.
My question . . . could it be short lengths of two different thicknesses of brass rod?
I've got a bunch of tiny brass pins. They're just over a quarter inch long. I can't remember where they came from.
Nori
My question . . . could it be short lengths of two different thicknesses of brass rod?
I've got a bunch of tiny brass pins. They're just over a quarter inch long. I can't remember where they came from.
Nori
-
dw
- Seanchaidh
- Posts: 5830
- Joined: Wed Jan 01, 1997 10:00 am
- Full Name: DWFII
- Location: Redmond, OR
- Has Liked: 204 times
- Been Liked: 125 times
- Contact:
Re: Outsoles
Nori,
Sure like to see some of those and maybe find out where they came from.I reckon some of these are 19 or 20 gauge maybe even smaller.
Tight Stitches
DWFII--HCC Member
[center]Little Jack Dandiprat in a white petticoat,
The longer he lives, the shorter he grows.[/center]
Sure like to see some of those and maybe find out where they came from.I reckon some of these are 19 or 20 gauge maybe even smaller.
Tight Stitches
DWFII--HCC Member
[center]Little Jack Dandiprat in a white petticoat,
The longer he lives, the shorter he grows.[/center]
-
elfn
- 3
- Posts: 132
- Joined: Tue Mar 01, 2011 10:00 am
- Full Name: Nori Lamphere
- Location: Onalaska, WA, USA
- Contact:
Re: Outsoles
Here you go, DW. From left to right, 17x1", 16x5/8", tailor's solid head pin, brass pin. It's a little longer than I thought, not quite 5/8" long, a hair over 1/2" long, but you can see how slender it is in comparison to the brads. It's minutely thicker than a pin.
Nori
Nori
You do not have the required permissions to view the files attached to this post.
-
elfn
- 3
- Posts: 132
- Joined: Tue Mar 01, 2011 10:00 am
- Full Name: Nori Lamphere
- Location: Onalaska, WA, USA
- Contact:
Re: Outsoles
DW, this site model train supplies has 1/8" brass brads. They're really tiny. You'll have to click through to page 3.
They come in packs of 300 for ~$8.
Nori
They come in packs of 300 for ~$8.
Nori
You do not have the required permissions to view the files attached to this post.
-
dw
- Seanchaidh
- Posts: 5830
- Joined: Wed Jan 01, 1997 10:00 am
- Full Name: DWFII
- Location: Redmond, OR
- Has Liked: 204 times
- Been Liked: 125 times
- Contact:
Re: Outsoles
Nori,
Thanks.
Are they solid brass...if you clip the head off would the core of the shaft still be brass?
So..."tailor's pins" Is that it, do you think?
Tight Stitches
DWFII--HCC Member
[center]Little Jack Dandiprat in a white petticoat,
The longer he lives, the shorter he grows.[/center]
Thanks.
Are they solid brass...if you clip the head off would the core of the shaft still be brass?
So..."tailor's pins" Is that it, do you think?
Tight Stitches
DWFII--HCC Member
[center]Little Jack Dandiprat in a white petticoat,
The longer he lives, the shorter he grows.[/center]
-
elfn
- 3
- Posts: 132
- Joined: Tue Mar 01, 2011 10:00 am
- Full Name: Nori Lamphere
- Location: Onalaska, WA, USA
- Contact:
Re: Outsoles
DW, the tailor's pin is stainless and about 1 1/8" long. I use those when I quilt or sew (non-leather/non-cordwaining stuff).
The brass pins I have came with a shirt Wadly bought. They were holding the shirt in its folded configuration.
The tiny brass brads I posted are significantly shorter and a bit smaller around (I think).
Nori
The brass pins I have came with a shirt Wadly bought. They were holding the shirt in its folded configuration.
The tiny brass brads I posted are significantly shorter and a bit smaller around (I think).
Nori
-
elfn
- 3
- Posts: 132
- Joined: Tue Mar 01, 2011 10:00 am
- Full Name: Nori Lamphere
- Location: Onalaska, WA, USA
- Contact:
-
athan_chilton
- 4

- Posts: 163
- Joined: Sun May 17, 2009 7:03 am
- Full Name: Athan Chilton
- Location: Urbana, IL, USA
Re: Outsoles
I have a question about sewing the outsoles (by hand) on my Packer style boots; this will be the first time I have ever tried to do this. How long, overall, should my thread be? I know how long a thread I started with for my inseaming, but suspect this should be much longer, given the higher number of stitches that will be taken compared to those made during in seaming. The boots are ladies' and about a size 6. Anybody got a way to estimate? I'd prefer not to have to make a knot to attach a new thread partway through the process.
-
romango

- 8
- Posts: 854
- Joined: Wed Apr 18, 2007 1:40 pm
- Full Name: Rick Roman
- Location: Eugene, Oregon, USA
- Been Liked: 8 times
- Contact:
Re: Outsoles
For my most recent outsoles with a 53cm welt (heel breast to heal breast) at 8 spi, I used 150 inches of 5 strand waxed Teclon thread.
-
lancepryor
- 7

- Posts: 662
- Joined: Wed Mar 31, 2004 6:42 am
- Full Name: lance pryor
- Been Liked: 6 times
Re: Outsoles
Athan:
I would say that the 150 inches cited by Rick is about right -- perhaps a bit high, but you've got to use some of that for attaching the bristle, and better to have too much than too little.
There are more stitches in an outseam, but each stitch uses alot less thread than the inseam stitches -- if you are doing a 1/4 inch welt/outsole, and the stitch is buried say 3/32" in the sole (channel), then each stitch uses 5/32" (x2) of thread, whereas each inseam stitch may use 3/8" [i.e. 12/32"] of thread (x2) -- this ends up with the two types of sewing using about the same amount of thread when sewing 8 spi outsole seams and 3 spi inseams.
Here is how I'd estimate it, if I wanted to do it mathematically but be conservative:
(Thickness of welt/outsole x 2 x SPI x inches to be sewn) + (2 x inches to be sewn) + 48 inches)
so, on an outseam that is 18 inches long, 1/4" edge, 8 spi, you'd get:
(1/4" x 2 x 8 x 18) + [2 x 18"] + 48" = 72 + 36 + 48 = 156 inches -- almost spot on to what Rick suggested.
The 48 inches added is for the bristles and a couple of feet of spare thread.
A beveled waist uses a bit less thread, since the stitches in the waist are sewn at about 6 spi and through a thinned welt and outsole.
Lance
-
dw
- Seanchaidh
- Posts: 5830
- Joined: Wed Jan 01, 1997 10:00 am
- Full Name: DWFII
- Location: Redmond, OR
- Has Liked: 204 times
- Been Liked: 125 times
- Contact:
Re: Outsoles
I automatically skein off 12 feet (144 in.) for both inseaming and outseaming. I always have more than enough for inseaming and have never yet come up short outseaming at 10-11 spi.
Happy Easter everyone.
Tight Stitches
DWFII--HCC Member
[center]Little Jack Dandiprat in a white petticoat,
The longer he lives, the shorter he grows.[/center]
Happy Easter everyone.
Tight Stitches
DWFII--HCC Member
[center]Little Jack Dandiprat in a white petticoat,
The longer he lives, the shorter he grows.[/center]
-
dearbone
- 8
- Posts: 1032
- Joined: Fri Oct 12, 2007 12:23 pm
- Full Name: Nasser Vies
- Location: Toronto, Ontario, Canada
- Been Liked: 3 times
Re: Outsoles
Shoemakers do not traditionally measure their sewing/stitching thread by measuring tape,Both arms stretched straight,end to end, mine is about 65 inches, double that and a little extra for the gods and those who still use bristles and that is enough for breast to breast sole stitching,For inseaming of the same, one arm length stretched to the other shoulder x 2 will be enough for inseaming.
-
kemosabi
- 5

- Posts: 250
- Joined: Thu Jan 20, 2011 4:03 pm
- Full Name: Nat Ledbetter
- Location: Tennessee, USA
- Been Liked: 1 time
Re: Outsoles
I also use the "wing-span" approach; For an average size-9 mens: Hand to hand, full span. x2 for 3/4 welt. x3 for full welt (around the heel). Same for Sole stitching. If there's any doubt, go another half-span for good measure.
Thread length seems like a big deal at first, but it sorts itself out the more soles you sew.
Cut way more than you think you need, measure the extra when you're done and then you'll know how much to adjust the length next time.
Cheers,
-Nat
Thread length seems like a big deal at first, but it sorts itself out the more soles you sew.
Cut way more than you think you need, measure the extra when you're done and then you'll know how much to adjust the length next time.
Cheers,
-Nat
-
romango
- 8
- Posts: 854
- Joined: Wed Apr 18, 2007 1:40 pm
- Full Name: Rick Roman
- Location: Eugene, Oregon, USA
- Been Liked: 8 times
- Contact:
Re: Outsoles
Here is a photo I posted on Facebook that people seemed to like. So I thought I'd share it here as well...
You do not have the required permissions to view the files attached to this post.
-
damocles
- 1
- Posts: 13
- Joined: Sat Mar 24, 2012 7:48 am
- Full Name: Paul Gilbert Baswell
- Location: Henderson, Nevada, United States
Re: Outsoles
THE BRAS PINS CAN BE PURCHASED AT ANY GOOD SEWING SUPPLY STORE THEY ARE LONGER THEN YOU WOULD NEED BUT THEY ARE ABOUT THE RIGHT DIAMETER LEAVE THEM HIGH AND CLIP THEM OFF THEN SAND THEN DOWN FLAT
-
lancepryor
- 7
- Posts: 662
- Joined: Wed Mar 31, 2004 6:42 am
- Full Name: lance pryor
- Been Liked: 6 times
Re: Outsoles
Rick:
Nice picture.
Are you pre-holing with an outsole stitcher? I assume those needles are the ones you make with guitar strings?
Lance
Nice picture.
Are you pre-holing with an outsole stitcher? I assume those needles are the ones you make with guitar strings?
Lance
-
romango
- 8
- Posts: 854
- Joined: Wed Apr 18, 2007 1:40 pm
- Full Name: Rick Roman
- Location: Eugene, Oregon, USA
- Been Liked: 8 times
- Contact:
Re: Outsoles
Lance,
Those are just marks made with my stitch marker. And yes, I always use steel bristles made from guitar strings. This is the best method IMHO.
Those are just marks made with my stitch marker. And yes, I always use steel bristles made from guitar strings. This is the best method IMHO.
-
piper
- 2

- Posts: 56
- Joined: Thu Dec 02, 2010 10:00 am
- Full Name: Diane
- Location: Santa Barbara
Re: Outsoles
Sorry to keep asking this question again.
I have been using Barge cement purchased in a blue tube at the hardware store. It simply does not stick at all. People here have told me I need to sand the outsole, use two layers of glue, let it dry, heat it up then press heavily. But I still cannot get the glue to stick.
I don't know what it is, is it that it simply doesn't stick to Vibram Newporter soles? Sanding Vibram Newporter seems to have no actual effect on the rubber. It is highly resistant to sandpaper. I've used a coarse file on it instead and there is no removal of rubber when rubbed all over with a coarse file. How do shoemakers/repairers prepare this soling material?
I thought maybe the glue simply doesn't stick to Vibram cloud. However, it appears not to stick to the rough side of vegetable-tanned leather, either. And I've had Vibram Newflex come un-glued as well.
Is the problem the glue? The stuff in the blue tube says no tuolene. Is tuolene the secret ingredient that makes the glue stick?
Is the problem the heat is not hot enough? I used a hair dryer to heat up the glue before pressing together. The glue appeared to get shiny and sticky upon application of the heat. But 10 miles of walking later the soles are peeling all around the edges and all I have to do is stick a fingernail in there, get a good grip and I can rip the whole thing off.
Is there another brand of glue that will actually work? Being a non-professional, I have access to the glues on this website. Would you recommend one of these to have better success?
http://www.cobblersupplies.com/servlet/the-Adhesives-%26-Glue/Categories