Page 76 of 78
Re: Tools of the Trade
Posted: Wed Sep 12, 2018 7:49 am
by SharonKudrle
I am so grateful for your offer of help Al, the machine hasn't been set up yet. I apologize, but due to computer issues on my end I won't be able to add more photos until after ~6pm today. I did manage to upload a photo of the control panel, and I'll scan the manual that came with the machine and post that along with other photos if that is okay. Crimping machines are so rare, it seems that manual ones have been around since the early 1800s, but I haven't seen any at all for sale.
It seems like less work to make a two piece boot, but having bunched leather around the front of your ankle if you are spending all day in a saddle might cause circulation problems that wouldn't be a problem if you are on foot. I haven't had any problems crimping vamps with tongues as they have a relief cut built in, but crimping the front of a wellington 2 piece with not very stretchy modern veg. tan leather has been a challenge.
Re: Tools of the Trade
Posted: Wed Sep 12, 2018 11:09 am
by SharonKudrle
I am having computer issues at this end, and will have to continue this post this evening after 6pm. I did have time to upload the photo above and will add others and the manual this evening.
Re: Tools of the Trade
Posted: Wed Sep 12, 2018 11:09 am
by SharonKudrle
SharonKudrle wrote: ↑Wed Sep 12, 2018 7:49 am
I am so grateful for your offer of help Al, the machine hasn't been set up yet. I apologize, but due to computer issues on my end I won't be able to add more photos until after ~6pm today. I did manage to upload a photo of the control panel, and I'll scan the manual that came with the machine and post that along with other photos if that is okay. Crimping machines are so rare, it seems that manual ones have been around since the early 1800s, but I haven't seen any at all for sale.
It seems like less work to make a two piece boot, but having bunched leather around the front of your ankle if you are spending all day in a saddle might cause circulation problems that wouldn't be a problem if you are on foot. I haven't had any problems crimping vamps with tongues as they have a relief cut built in, but crimping the front of a wellington 2 piece with not very stretchy modern veg. tan leather has been a challenge.
Re: Tools of the Trade
Posted: Wed Sep 12, 2018 4:05 pm
by SharonKudrle

I am so grateful for your offer of help Al, the machine hasn't been set up yet. I apologize, but due to computer issues on my end I won't be able to add more photos until after ~6pm today. I did manage to upload a photo of the control panel, and I'll scan the manual that came with the machine and post that along with other photos if that is okay. Crimping machines are so rare, it seems that manual ones have been around since the early 1800s, but I haven't seen any at all for sale.
It seems like less work to make a two piece boot, but having bunched leather around the front of your ankle if you are spending all day in a saddle might cause circulation problems that wouldn't be a problem if you are on foot. I haven't had any problems crimping vamps with tongues as they have a relief cut built in, but crimping the front of a wellington 2 piece with not very stretchy modern veg. tan leather has been a challenge.
[/quote]
Re: Tools of the Trade
Posted: Wed Sep 12, 2018 4:07 pm
by SharonKudrle
IMG_1404.JPG
My apologies, readers. I am and have been communicating with the HCC Forum Admin. to resolve posting issues. Thank you for your patience,
Sharon
As of today Sept 14, I am still working on deleting redundant posts, again, my apologies. When I get the issue resolved I will somehow post more photos and the manual. We are working on getting the 220 volt outlets/cables into the garage. It is like putting in an outlet for a oven.
Re: Tools of the Trade
Posted: Tue Sep 18, 2018 5:15 pm
by SharonKudrle
Here are the instruction manual pages, there are more with diagrams but that will be many pages more. These can be uploaded as a start.
IMG_1415.JPG
[/img]
IMG_1416.JPG
IMG_1417.JPG
[img]
IMG_1418.JPG
Re: Tools of the Trade
Posted: Tue Oct 30, 2018 2:15 pm
by john_ralston
So...I guess you don't know what you don't know! Bought these off eBay, and they are in fantastic condition... fantastically, tiny condition. They are only 7-1/2" long. Had no clue to even ask about size. What would a small lasting pliers like this be used for?
Re: Tools of the Trade
Posted: Wed Oct 31, 2018 4:34 am
by das
John, nice pair of "Whitcher" (round screw-off hammers) pincers. Just a guess, but US child labor laws are fairly recent, these could have been for kids, c.1880-1900s?
Re: Tools of the Trade
Posted: Wed Oct 31, 2018 5:35 am
by dw
Or just for small hands and/or small lasts. I had a pair of these and I liked them but while there are certain drafts where I like the Whitcher style pincers, the jaws weren't that narrow...so not best for around the toe...and I prefer the Berg style pincers in most situations.
Re: Tools of the Trade
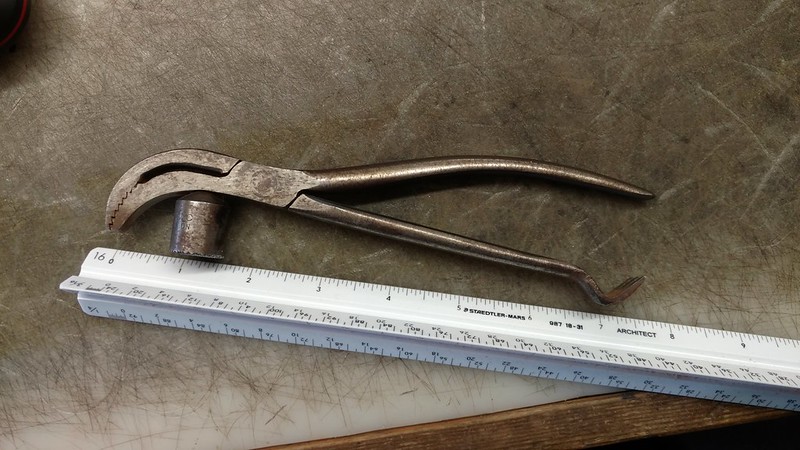
Posted: Sun Nov 11, 2018 10:48 am
by Anton K
Could someone please explain how to use this tool?

Re: Tools of the Trade
Posted: Sun Nov 11, 2018 1:28 pm
by das
Wet Mill--Clamped atop your thigh with the stirrup (in rounded gouged-out bit). Straight knife hooked into notch of appropriate depth, while forcefully pulling the welt under the knife to skive down to desired thickness.
Re: Tools of the Trade
Posted: Sun Nov 11, 2018 2:03 pm
by Anton K
thank you, das
Re: Tools of the Trade
Posted: Thu Nov 29, 2018 8:02 pm
by licere
Hello All,
I have a question about the proper tool to use in order to achieve a specific edge profile when trimming the welt. Thus far, I've been trimming with either a welt/rand knife or a common edger. I'll pose my question in the form of the image below, which includes the edge profiles I'm getting with those two tools, as well as the edge profile I'm seeking.
Thanks!
Peter
welt trim.jpg
Re: Tools of the Trade
Posted: Thu Nov 29, 2018 8:49 pm
by dw
I don't think it matters...the only way I know to get that profile is with an edge iron that incorporates a "jigger step." Maybe @das knows better.
Re: Tools of the Trade
Posted: Fri Nov 30, 2018 6:02 am
by das
Yup. It's usually the "wire" (tiny raised ridge filed-in at the foot of the edge iron's face at the guard), the "wire"creates that crease round the edge of the welt. I think Golding has a good illus. section on "kit cutting" (shaping edge irons). A "Jigger" is a different tool from an edge iron (AKA "collice"), but likewise it, too, has a "wire" for making that crease (see Salaman).
Re: Tools of the Trade
Posted: Fri Nov 30, 2018 6:10 am
by das
Here's an image from Styleforum illustrating the details:
Re: Tools of the Trade
Posted: Fri Nov 30, 2018 6:23 am
by das
Here're some good illus. of a long-handled "Jigger". (NB--a long-handled "waist edge iron" is very similar, but different angles to the head and face=not a Jigger).
http://www.oldhandtools.co.uk/shoemaker ... -edge-iron
The architecture of the iron is clearly shown, including the "wire". The long handle is braced against your chin, while you grip the handle near the iron for pressure and moving the heated iron along the sole edge. The tip of the "guard" pushes the welt stitches into a neat row, while the "wire" makes that crease you asked about--it's more a welt-dressing tool than an edge iron per se, as the face does not iron the entire sole edge.
Interestingly, the "Jigger" is the first (heated) iron edge-finishing tool mentioned in the British texts (Rees, 1813). Fully developed edge irons, as illus. in the Styleforum image, do not appear until 1824 in France, (
an excellent book with lots of early illustrations of tools, lasts, etc.
Re: Tools of the Trade
Posted: Fri Nov 30, 2018 7:21 am
by dw
^
I think I posted that on SF

(it's from Salaman). But the interesting thing is that if we ascribe any legitimacy to Salaman...and
@das was a consultant, so I think we must...Salaman calls the cut in the face of the iron just above the sole guard, the 'crease'':
"The term 'crease' relates to the crease formed in the iron..." and the moulding it makes on the edge of the outsole as the 'bead' or more obscurely the 'wire' (and there can be beads or wires at both the 'top' (grain) edge of the outsole and the edge of the welt, depending on the type of edge iron).
The 'shoulder', which is what
@licere wanted,
"is formed on the edge of the welt by the jigger-step on the Iron."
FWIW, in the boot culture I came up in, the shoulder formed by the jigger-step was virtually unknown and 'wires' (beads) on both the top and bottom edge of the sole were preferred. This might be partially due to the inclusion of rotary edge irons on finishers although I think that hand
"Irons made without the jigger-step are known as 'plain' or 'blind' " and pre-date wide spread use of rotary irons. I am not sure of that last bit...again, @das can clarify, I'm sure.
Quotations cited above are from R.A. Salaman's
Dictionary of Leather-Working Tools c. 1700-1950, George Allen & Unwin Ltd, London, 1986.
Re: Tools of the Trade
Posted: Fri Nov 30, 2018 7:32 am
by das
Thanks for the refresher DW. I only "consulted" for Salaman on the early tools in my own collection, not "modern" edge irons. Neat piece of history/evolution/technology, but.... Interestingly, the 1864 US QM banned the use of heated edge irons for Army contract work, because the heated edge of the guard might scorch a line along the uppers, if used carelessly, which led to the uppers cracking or breaking-off at the line--wood shoulder sticks were stipulated instead. I'm a devotee of (damp) burnished edges w/ wood or bone shoulder sticks--but then I'm mostly doing historical footwear with period-correct pre-1850 techniques

Re: Tools of the Trade
Posted: Fri Nov 30, 2018 7:52 am
by dw

Salaman is always right at my side--it sits on my desk next to the computer and keyboard.
FWIW, although I've never had any problem with scorching (I don't trim my outsoles that close), I know (from Salaman) that using a fudge wheel was despised by most of the oldtimers simply because it too was heated and it was/is
always run against the side of the vamp.
Me? I'll take a 'stitch-prick' every time.
Re: Tools of the Trade
Posted: Fri Nov 30, 2018 12:41 pm
by licere
Thank you
@dw and
@das
I've got the right edge irons, which include a jigger step. To see the step effect more clearly than I have been achieving, I suspect I'll need to 1) ensure that my trimmed sole edge is more uniform in thickness along the full length, 2) perhaps add more moisture than I have been adding to the edge before applying the iron, and 3) practice.
It's always pleasantly humbling to be reminded that the answer is more often found in properly using a tool on hand than in acquiring a new tool.

With Gratitude,
Peter
Re: Tools of the Trade
Posted: Fri Nov 30, 2018 1:08 pm
by dw
Some sources suggest a little heat to 'set' it as well.
Re: Tools of the Trade
Posted: Sat May 18, 2019 4:38 pm
by dw
Getting reacquainted with my old Barnsley scrapers.
20190515_152348.jpg
Re: Tools of the Trade
Posted: Sun May 19, 2019 6:50 am
by dw
^ The trick is in the sharpening. Scrapers made for wood (my first experience with scrapers) are usually sharpened square to the edge; and, of course broken glass results in a square edge also.
But the Barnsley's were originally sharpened at an angle (not sure what angle that was). When I tried sharpening the Barnsley's square the result was less than satisfactory and not really equal to broken glass.
When I sharpened the Barnsley's at an angle, the scraper was actually sharper than the glass and more aggressive. And...jury is till out...I suspect that the edge on the Barnsley's will last considerably longer, and stay sharp longer, than that on glass.
Re: Tools of the Trade
Posted: Sun May 19, 2019 4:46 pm
by dw
There is one other part to this...I can break a piece of glass, pretty much at will, to achieve a convex curve. In both directions. But for the life of me I cannot break a tight radius curve.
One of the reasons I took another look at my Barnsley scrapers...they've been 'on display' for years...is that I am doing 'cuban' / hollow sided heels (as you can see in the photo above) for a pair of women's alligator shoes. I wanted a curve that was about the radius of a quarter. The Barnsley #2 comes with one that size.
And, as I had some woodworking scrapers in odd sizes and shapes, I now also have one the size of a penny and one with the radius of a nickle...all the way up to one with a curve the size of a baseball and another couple that have absolutely straight edges.
Only time will tell, but in preliminary testing they were amazingly good--surprised me because in the past I had not thought a sharp edge comparable to what one could achieve with broken glass was possible.