Page 43 of 67
Re: The Gallery
Posted: Sat Feb 15, 2014 9:01 am
by dw
Jake,
Nice looking. Great colour combo and the stitch pattern.
Best thing I've found to get rid of silver pen marks is
Glenkaren Cleaner/Conditioner. Guy I made a pair of shoes for developed this product and it's great. All natural...you can even eat it if you get peckish while bulling a pair of shoes.

It seems expensive but not only are the jars about three times the size of say, Meltonian, but you use this product much more sparingly. Only drawback is that the earth pigments he uses for colouring the cream tend to precipitate out when it is still warm--you need to thoroughly mix the jars when you get them. This is for the creams only. Once you do that I've not had it happen again.
Re: The Gallery
Posted: Sat Feb 15, 2014 9:05 am
by dw
homeboy wrote:Never placed a midsole on a boot before. These were a "booger" to sew 7 spi!
It's a matter of preference and what the "customer" orders but midsoles are generally no heavier than 2/3's (?) the thickness of the outsole. Looks to be a full 10-11 iron midsole?
Re: The Gallery
Posted: Sat Feb 15, 2014 4:09 pm
by homeboy
Dee-Dubb,
Yeap.....10-11 iron (now you tell me!)

Thanks for the info on the cream.
Will Cody is really pleased with the boots. Perfect fit, if I say so myself. He's got my foot though......wide & blunt! I've got to learn how to "squeeze" someone like him and myself into a slimmer profile toed boot. That's my next project. Too bad I'm so busy with other projects in life. I sure miss bootmaking!
Re: The Gallery
Posted: Wed Mar 05, 2014 2:00 am
by dmcharg
G'day all,
This is my latest pair of shoes, for my wife. Veg tanned throughout, Kangaroo uppers, hand sewn throughout (upper and inseam), sewn heelseat to sole, cement forepart. Sandra wants black laces tho' so I'll make some of them soon. They went through a few modifications from the original design; moulded toe cap and external heel cup. I'm out of practice (first full size pair in a year or so) but I'm looking forward to the next pair, which I hope to start in the next week or so, and they are going to be something quite different for me. Stay tuned

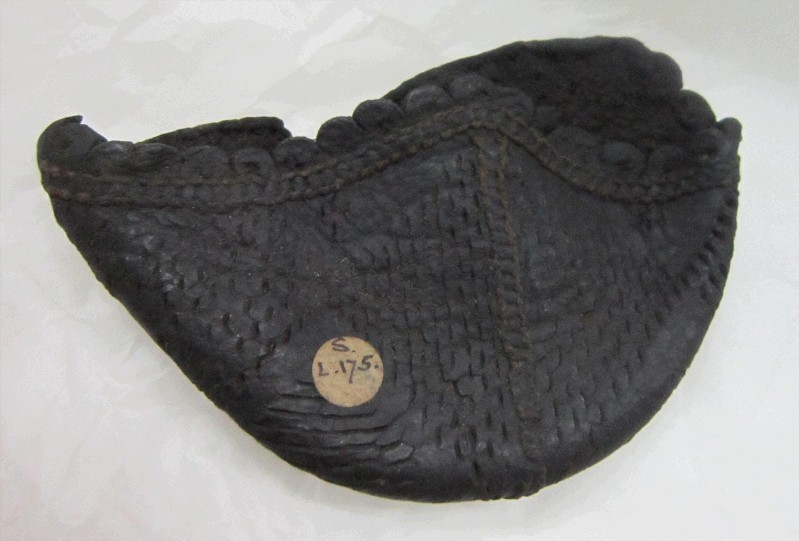
I also made another miniature boot for my own collection as the other 3 have been sold.
DSCN9388.jpg
DSCN9380 (1).jpg
Toe cap at 16spi by eye, and heel cup 13spi by eye
16 and 13spi.jpg
Gallery's been very quiet lately...
Cheers
Duncan
Re: The Gallery
Posted: Fri Mar 07, 2014 1:58 pm
by fclasse
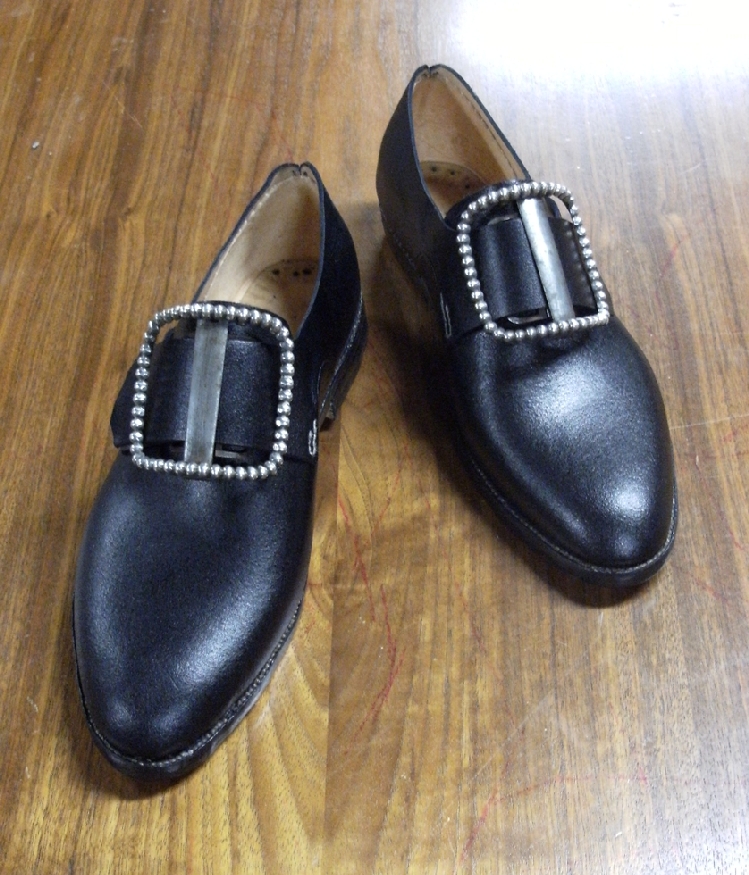
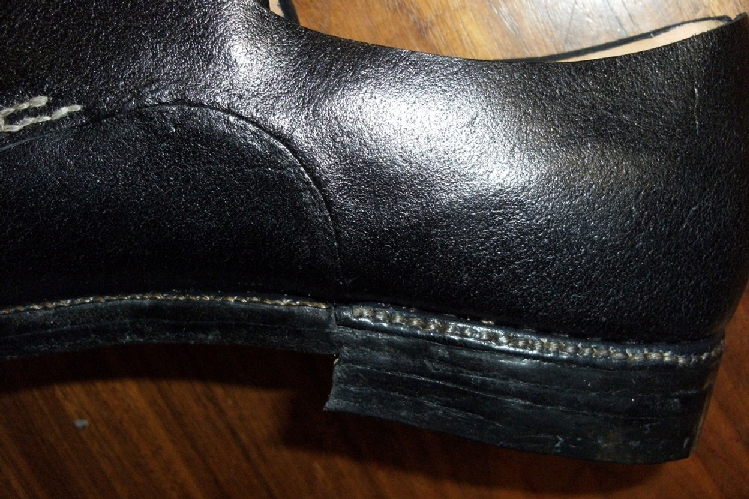
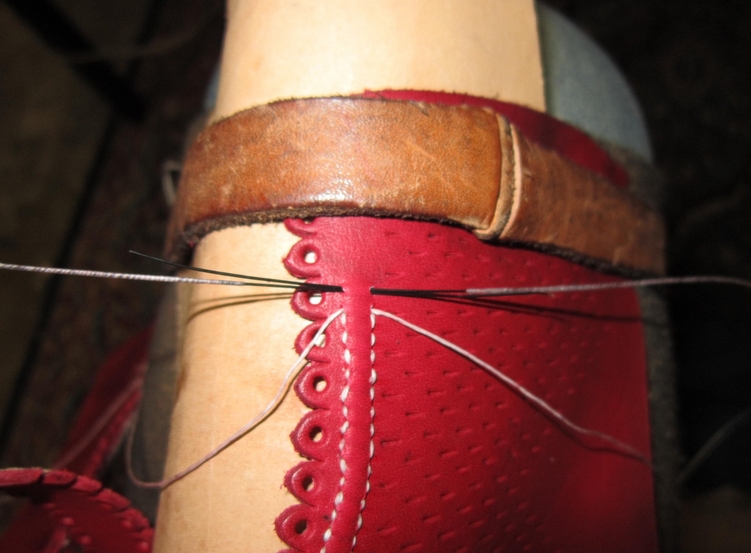
My first real pair of early modern shoes, with antique silver hinged 18th century buckles from a museum deaccession. Upper leather from Dickens Bros, and insole/sole/rand from Rendenbach. Sewing and stitching was all done by eye with bristle and linen. I learned a great deal from this attempt, and I see lots of flaws, but I'm particularly displeased with the way the heel rand stitching came out - I'll probably sew the split lift on using a blind stitch next time and hammer the heel rand up to hide the stitches. I'm also concerned with the less-than-perfect finish of the heel. I suspect my rasp was dull, since it seemed that the glass took off more than the rasp did, and maybe I needed to hammer more or add more heel ball to fill in the gaps. But seriously, open kimono - I'd be grateful for any comments or suggestions. Still not clear on the "setting stitches" business, but I haven't had a moment to dig through the HCC for more information.
I don't like the lasting tacks staining the insole, but I'm not quite sure how to get around it other than pasting in a sock.
Stitching by eye at about 10spi.
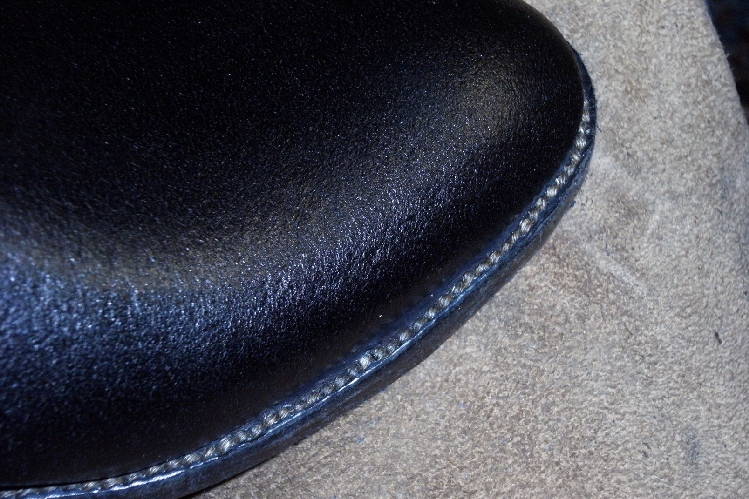
The two lifts are pasted and pegged on. Next time, I'll probably do a blind stitch and stitch through the first lift with a heel awl. There seems to be a gap between the heel rand and the split lift - not quite sure why I didn't notice it then, but I see it now. A bit of grinning and uneven stitching, but I think I can do better the next time.
Francis
Re: The Gallery
Posted: Fri Mar 07, 2014 3:59 pm
by dmcharg
Hey Francis, Grab some solid brass 'escutcheon pins' (they come in various sizes) from a hardware shop or picture framing place. No staining.
Cheers
Duncan
Re: The Gallery
Posted: Mon Mar 10, 2014 10:48 am
by fclasse
Thanks for the tip - in terms of historical practice, I'm just not sure if they would have been using brass tacks then for lasting. I'll have to look at Garsault/Diderot and see if they call out what kind of material the lasting tacks were made out of.
Francis
Re: The Gallery
Posted: Thu Mar 13, 2014 6:03 am
by das
Francis,
Sorry I'm late commenting on your waxed calf shoes. Very respectable work. The stitched rand is biting-off a big challenge--you did good. Hope you post your red 17thc repro shoe here too. Tell us about the lasts you're using--they look crooked (left and right).
If you want to get a smoother burnished finish on that Dickens waxed calf before you do final polishing, get some pure wheat wall-paper or bookbinders' past and mix it to the consistency of thick cream. Wipe it on the (lasted) upper with your fingers, not too thickly, and once it's semi-dry, burnish the flesh with a good bone. The exact degree of dryness/wetness is tricky (maybe 10-15 mins depending on ambient humidity), but when you hit it just right it'll come up like glass, the paste filling-in the rough flesh. Lay your polish on top, brush it off, and it should look like shiny grain leather.
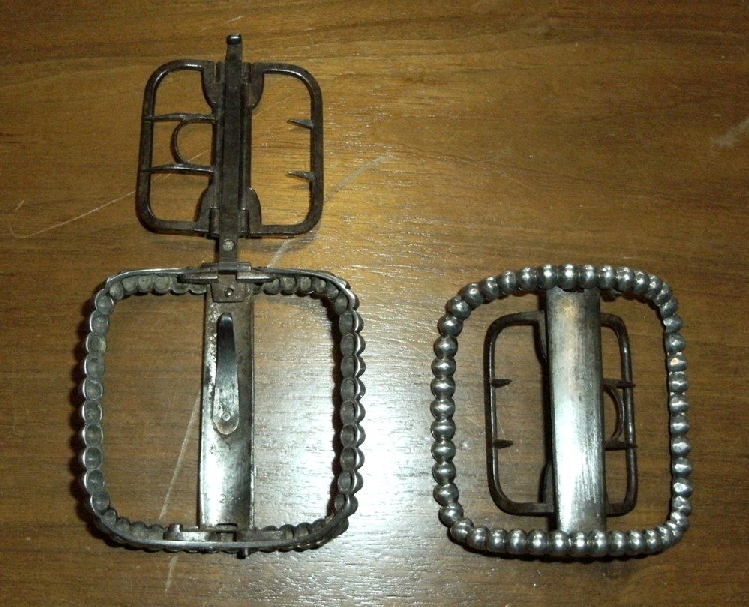
BTW, that Georgian "court shoe" buckle is very late, post 1800(?), and missing the leather "plug" that went in the middle to hide the iron clip. You really need the buckles with chapes and tongues to compliment that shoe.
Re: The Gallery
Posted: Thu Mar 13, 2014 3:20 pm
by fclasse
D.A.,
Thank you very much for the comment! I just ordered a batch of wheat paste from Talas, and I'll definitely give that a shot on the next pair of shoes. As for the lasts, you're right on, they're crooked vintage wood lasts, but I ground the waist of them quite a bit to make them look more like the single straight men's period last that I have (sized for my foot).
As to the buckle, I just sort of clamped the straps behind the buckle, as I figured that I would let the owner punch the holes himself. But, they are hinged buckles with dual tynes like a proper period buckle, but the tynes are also hinged and there is a patent mark. They do read later to me, but when I offered these and a set of earlier ones of the same size, the buyer preferred these =)
Francis
Re: The Gallery
Posted: Fri Mar 14, 2014 12:18 pm
by fclasse
This is a style based upon the pair of 1600s whittawed shoes in the Ashmolean museum in Oxford. Although lasted left and right, I now have straight lasts for these in the future! The decorative and functional opening reinforcement is based on several pieces that I examined in detail at the Museum of London archives. I was surprised at how common this type of reinforcement stitching was on so many 16th C. pieces that I examined, and not just fine work, but this was even on the shoes of sailors aboard the Mary Rose when it sunk in 1545.
Biggest qualms are the uneven rand stitching and the heel cover turn - is not as clean as I'd like it. I've also never been able to satisfactorily make the transition at the waist from rand to heel cover. A bit of dye bleeding, but that's the price of not dying and currying the entire skin.

3 cord strand using 60/1 linen which I got from woolgatherers - the stuff is very light, but 3 cord was still suprisingly strong for the weight. About 9-10spi.
This is one piece that I looked to for inspiration, with reinforcement stitching right around 10-12spi.
Francis
Re: The Gallery
Posted: Fri Mar 14, 2014 12:41 pm
by das
Francis,
The earliest I can find that patent hinged/clamp buckle is c.1790s, all with a leather piece filling the frame/hiding the clamp, but if that works for your client it's his call certainly.
Talas paste is what we use. Mix it with cold water, experiment to find just the right level of dry/wetness to burnish it. If too wet it'll go duller than before. If too dry nothing much happens--there's a sweet-spot IOW.
I'm so glad you posted the red shoes. Stitched rands and covered heels are a booger-bear, and like the stitched rand on the black 18thc style shoe, you did very well for starting out. Next time try fatter threads, smaller stitches so the stitches look like "pearls" in a row. Your mock-round-closing reinforcement stitch is spot on. Keep up the good work.
Re: The Gallery
Posted: Fri Mar 14, 2014 1:22 pm
by romango
I commissioned this painting from an artist friend of mine. She has a whole series of them
http://www.olgalaxy.com/icons
Soon to be on Exhibit in the Univ of Oregon's prestigious art gallery! It's a Russian Icon with some modern bits!
st_crispin_lores.jpg
Re: The Gallery
Posted: Mon Mar 17, 2014 12:46 pm
by fclasse
D.A.,
Thanks for the helpful advice and kind comments! The original upon which this was based definitely has much finer stitching and used whittawed leather, which would also probably fold down better than the veg-tanned that I used. Next time, I'll probably try thinning down the heel cover leather a bit at the top edge to get a better fold over the heel.
Francis
Re: The Gallery
Posted: Tue Mar 18, 2014 3:04 am
by das
Francis,
Talas and Bookmakers (Baltimore, MD) both offer some neat early formula whittawed calfskins
Re: The Gallery
Posted: Tue Mar 18, 2014 11:20 am
by fclasse
D.A.,
Last time I visited Talas' brick and mortar store (my parents live in New York), they had some lovely calfskin, but it carried a commensurate price tag as well! I passed since most people that request repros worry about dirtying up white shoes, but I did pick up a very nice whittawed goatskin, which I plan to use for lining some ladies shoes in the near future. Bookmakers looks like they have some nice skins, though.
Francis
Re: The Gallery
Posted: Tue Mar 18, 2014 3:46 pm
by das
Francis,
At the level of work and detail you're going to, I'd make some dead-nuts whittawed shoes just to have around as work samples, and you'll gain valuable experience working with that historical material too. Don't just make what the customers' want--make exacting repros of the old stuff for the glory of the craft. Plenty of whittawed shoes got dirtied in the 16th and 17thc in wear, but you can always make the overshoes to go over them too.
Re: The Gallery
Posted: Wed Mar 19, 2014 5:54 pm
by fclasse
D.A.,
A good point. I should hit up some of my friends to split a skin of the whittawed calf from Talas. Still, I think I'd like to visit the Ashmolean and actually look at the extant pair in person before I go off and turn an attempted replica out. I've done repros in the past based on multiple pictures and measurements, but they don't really give you the full clarity of what the piece looks like in person. Thank you again for your encouragement!
Francis
Re: The Gallery
Posted: Thu Mar 20, 2014 5:00 am
by das
Francis, By all means, if you haven't studied the old stuff, go examine some artifacts--whole new worlds will open
Re: The Gallery
Posted: Thu Mar 20, 2014 10:04 am
by fclasse
D.A.,
No doubt - I visited the MoL archives to look through some of the shoes and pieces that they had stored and had my mind accordingly blown. =) Oxford is definitely next on the list, as is Northampton.
Re: The Gallery
Posted: Thu Mar 20, 2014 10:25 am
by admin
A word to the wise...The Gallery is intended for photos, esp. photos of finished work. Admin doesn't like it when he has to start looking at moving more than a couple of posts (which will usually be left in the Gallery). It's not that hard to move posts but it's not trivial either and it makes Admin cranky if only because it creates a suspicion that members aren't "into" the spirit of the forum.
Members are encouraged to find an appropriate forum/subforum for discussions that go beyond the occasional comment about a photo.
It is also worth remembering that posts in the Gallery are subject to deletion at Admin's discretion...and always have been. We do want to store/archive relevant information regarding the Trade which means that discussions that are worth saving need to be in threads where they won't be sacrificed/lost to make room on the server.
Just sayin'
Re: The Gallery
Posted: Fri Mar 21, 2014 3:51 am
by das
Emmett,
Not sure how to cut and paste on-going chatter/posts into a new thread. Feel free to move us over into historical techniques or something.
Re: The Gallery
Posted: Fri Mar 21, 2014 4:43 am
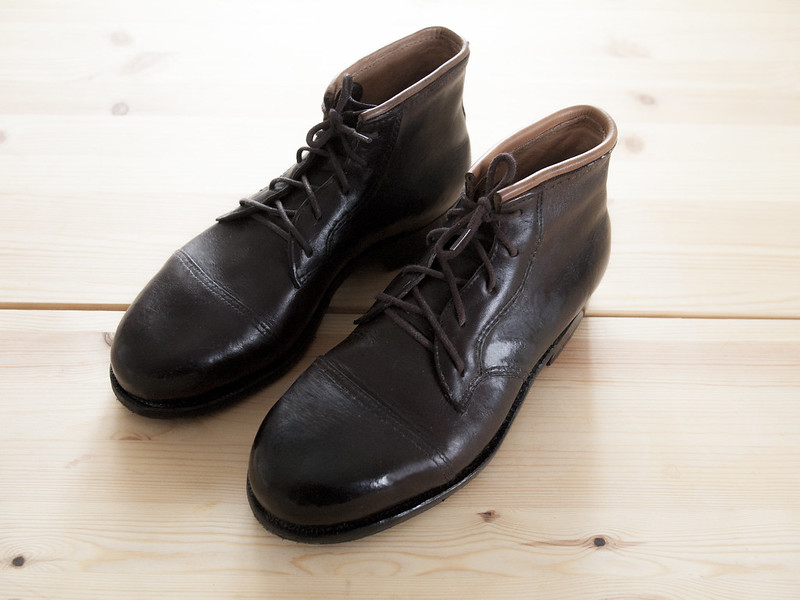
by Arttu
I just finished my first ever pair of shoes (or boots). Everything is hand made, mostly with homemade tools. I still have to do a few finishing touches, like changing the top beading (I actually managed to make them out of different leathers, so the other one is way too thick. Don't work when you are too tired, haha). They are full of mistakes and honestly don't look very good, but I'm very pleased that I managed to make a perfectly (functionally) wearable pair of shoes just by reading and watching youtube videos.
Re: The Gallery
Posted: Fri Mar 21, 2014 10:29 pm
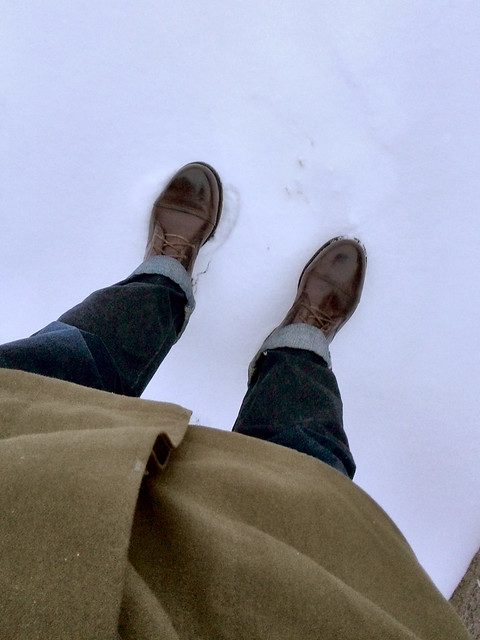
by 1947redhed
Arttu, you've done a remarkable job. Many of us wish our first pairs looked that good. On future pairs, you might want to move the seam of your toe cap a little more toward the toe. It looks like this pair has the seam right at the ball joint on the photo of your feet in the snow. That can cause some irritation at this sensitive part of the foot. If you eventually make shoes for others,particularly if they have bunions, friction in that area can be painful. Regards and keep up the good work. Georgene McKim
Re: The Gallery
Posted: Sun Mar 23, 2014 12:56 am
by homeboy
Arttu,
First pair? You done mighty fine! Congrats and keep 'em coming.
Jake
Re: The Gallery
Posted: Tue Apr 01, 2014 6:30 pm
by lancepryor
Well, it's been far too long since I finished a pair of shoes, but here is one. This is a plain toe oxford in a mahogany colored leather, with Bakers outsole and square waist stitched at 10 spi. I added a swan-neck facing for a touch of elegance.
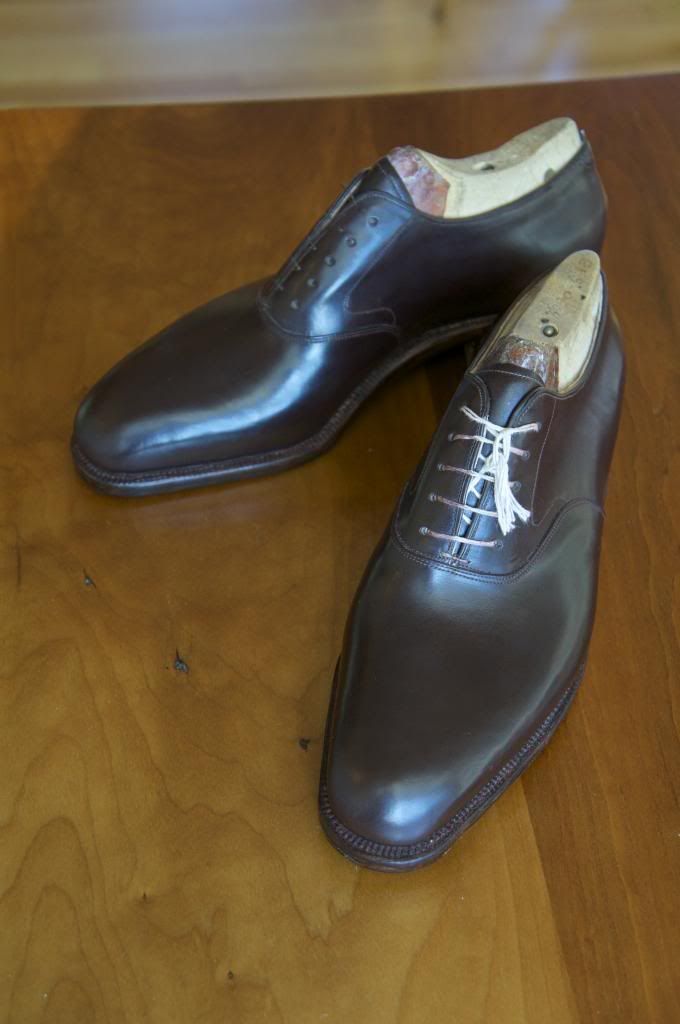
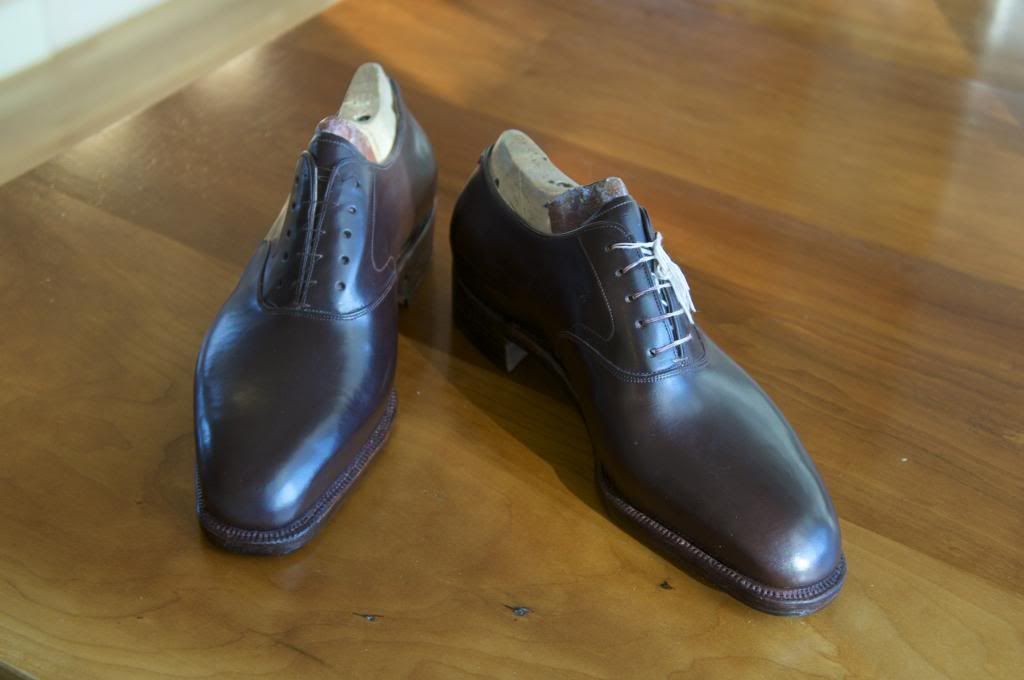
Lance

