Page 55 of 67
Re: The Gallery
Posted: Mon Dec 28, 2015 7:04 am
by Herr_Leeb
Fascinating work.
You are recreating shoes which were without a doubt made by the Berlutis of their time, not an easy feat. Kudos!!!
Your website is very interesting as well, love it.
Cheers,
A.
Re: The Gallery
Posted: Wed Dec 30, 2015 9:44 am
by martin
Thanks Alexander! Visited your blog, very nice read - looking forward for more!
Cheers,
Martin
Re: The Gallery
Posted: Wed Jan 13, 2016 9:38 am
by Herr_Leeb
I will take a break from shoe making for a while, so this is probably my last pair . Blue Stingray and black calf.
Thank you all for your feedback and advice, it has been a pleasure.
Cheers,
A.
Stingray.JPG
Stingray2.JPG
Re: The Gallery
Posted: Wed Jan 13, 2016 9:57 am
by paul

l LIKE 'em!
You'll be missed.
Paul
Re: The Gallery
Posted: Wed Jan 13, 2016 10:04 am
by dw
Nice.
I like them, even though I'm not wild about stingray.
But that's the way to do it--overlay a fine grained leather over the stingray to make the seam. Sewing directly into stingray is always problematic. I played with the overlay idea years ago...when 'ray first came on the market...and after breaking numerous needles in my OCD quest for a straight, even line of stitching, decided that if it were done 'twere better done like that. At which point, I decided 'twere better not done.
Never made a full pair of SR. Good on you.
Re: The Gallery
Posted: Wed Jan 13, 2016 10:28 am
by Herr_Leeb
I'm not crazy about Stingray either, it's a bit too flashy for me and I don't think I will wear these very often.
To be honest, I initially attempted to make seamless wholecuts with it - and failed. I don't think its possible because of the pebbles...
But it has it's advantages. No creasing and very easy to clean. Just wipe 'em off.
There is one easy way to avoid broken needles when working with Stingray:
Handcrank the sewing machine and go very slowly. This way the needle has a chance to slide off the pebbles.
I used an old table sewing machine with a standard needle and had no problem sewing.
Re: The Gallery
Posted: Thu Jan 14, 2016 1:41 am
by martin
Very nice! I like the look of them :-)
Re: The Gallery
Posted: Thu Jan 14, 2016 7:36 am
by dw
Herr_Leeb » Wed Jan 13, 2016 10:28 am wrote:
There is one easy way to avoid broken needles when working with Stingray:
Handcrank the sewing machine and go very slowly. This way the needle has a chance to slide off the pebbles.
You're right, that works...sort of...and I have no objection to handcranking if necessary (speed kills).
But I'm an "alpha-
numerical" male--OCD, IOW. And I'd almost rather the broken needles than the way the line of stitching meanders erratically around the pebbles--some stitches to the left (because the needle is sliding off the pebble to the left), some to the right; some short, some long.
At least that was my experience.
Re: The Gallery
Posted: Thu Jan 14, 2016 10:08 am
by Herr_Leeb
dw » Thu Jan 14, 2016 7:36 am wrote:Herr_Leeb » Wed Jan 13, 2016 10:28 am wrote:
There is one easy way to avoid broken needles when working with Stingray:
Handcrank the sewing machine and go very slowly. This way the needle has a chance to slide off the pebbles.
You're right, that works...sort of...and I have no objection to handcranking if necessary (speed kills).
But I'm an "alpha-
numerical" male--OCD, IOW. And I'd almost rather the broken needles than the way the line of stitching meanders erratically around the pebbles--some stitches to the left (because the needle is sliding off the pebble to the left), some to the right; some short, some long.
At least that was my experience.
DW,
I hear you loud and clear. As an amateur with limited skills and subpar equipment straight, clean stitches are a constant struggle for me.
Since I only have an old table sewing machine, getting an even line around the heel for example is difficult.
My workaround is not a technique which could be called professional by any means, it is rather something in the catagory "How to milk a mouse", but if you can't work smarter, you have to work harder

I PRESTITCH the holes on the leather while I can still lay it out flat, before assembly. I then glue the pieces to hold them in place and stitch through the existing holes.
In this set up, it does not matter if the needle slides a bit, the line will be fairly straight.
At least it looks ok from the highway in my mind...
IMG_2456.jpg
large.jpg
Cheers,
A.
Re: The Gallery
Posted: Sat Feb 13, 2016 8:08 am
by dw
Just finished these for a long time (30 years) customer.
Black waxed flesh buckle chukka, seamless back (inside and out), straps hand stitched at 12 spi.
DSCF3259 (1024 x 768).jpg
DSCF3266 (1024 x 768).jpg
DSCF3264 (1024 x 768).jpg
Re: The Gallery
Posted: Sat Feb 13, 2016 9:05 pm
by homeboy
Dee-Dubb,
Those look NICE!! 12 stitches per inch?

Re: The Gallery
Posted: Sat Feb 13, 2016 9:49 pm
by dw
Well, thanks Jake.
But IIRC, I was recently told that to get through the five level apprenticeship and become a journeyman (not master)...in the only Federally recognized certification program (established in 1940)...you have to be able to do 16spi on soles and 22spi on uppers. All by hand, all by eye.

Re: The Gallery
Posted: Sun Feb 14, 2016 6:32 am
by homeboy
Dee-Dubb,
What's "BELOW" a journeyman?

Just put me in the basement.....
Hope all is well Ol'buddy!
Re: The Gallery
Posted: Sun Feb 14, 2016 7:13 am
by dw
Jake,
Multiple levels of apprentice in a 5+ year program to be
certified as a journeyman.
As for the basement...as June Swann suggested, we are all there (with a few exceptions, such as DAS--who is a certified, bona fide
Master)--it's hubris to think otherwise.
The best you can do (and more than most will seriously pursue) is make sure you're on the stairs.
Re: The Gallery
Posted: Mon Feb 22, 2016 7:44 pm
by brooklyn_edie
... to the previous posts.... that makes me an amoeba.... in the basement of a basement of a journeyman's chimney sweep
--------------
Meant to post these some time ago. Amoebas move slow tho.
Porto Cow from the old Hardtke for tops. Bottoms is a different skin from the shop. Last size = 3. Built up from C to at least EE. Tiny but real chunky foot.
Customer is very happy. And that sure makes me smile.
Had some words of advice on these from Lee Miller, Wild Bill, and a visit with Paul Krause. Thanks much to all.
Re: The Gallery
Posted: Mon Feb 22, 2016 8:18 pm
by homeboy
Looking good! Great job!
You were talking to the right people!
Take care!
Re: The Gallery
Posted: Mon Feb 22, 2016 9:41 pm
by paul
Wow Edie! Nice job! Really good looking last! And the edges show lots of attention.
Thank you for including me in your comments, but it's all your work.
Paul
Re: The Gallery
Posted: Fri Feb 26, 2016 11:30 am
by brooklyn_edie
Thank youz sirs et al.
Nevertheless, your advice on adjusting the heel angle made all the difference.
Re: The Gallery
Posted: Thu Mar 17, 2016 3:45 pm
by Manuel
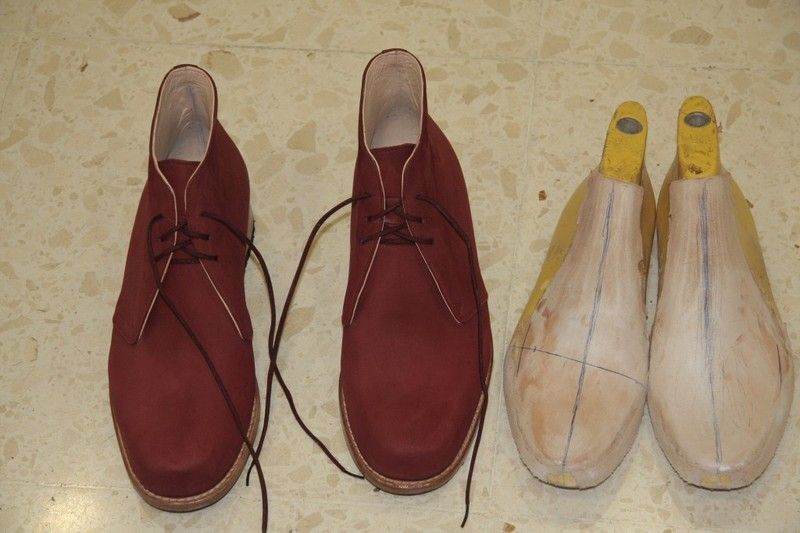
Hi to all,
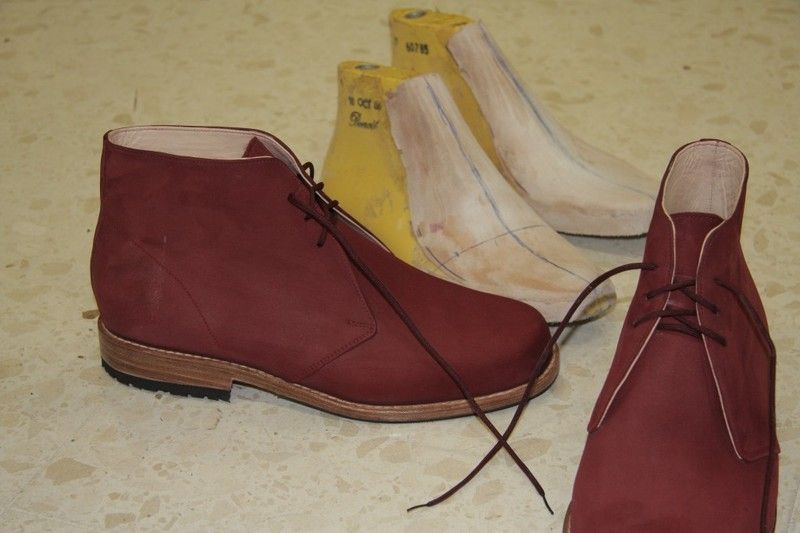
I'm new here. I'm spanish and I want to share with you my work, I hope you like it.
They are a Chukkas made totally by hand, the model has been made between alden and John Lobb.
A greeting.
Re: The Gallery
Posted: Fri Mar 18, 2016 3:35 am
by martin
Nice work, Manuel - thanks for showing!
What types of leather/tannage did you use?
Re: The Gallery
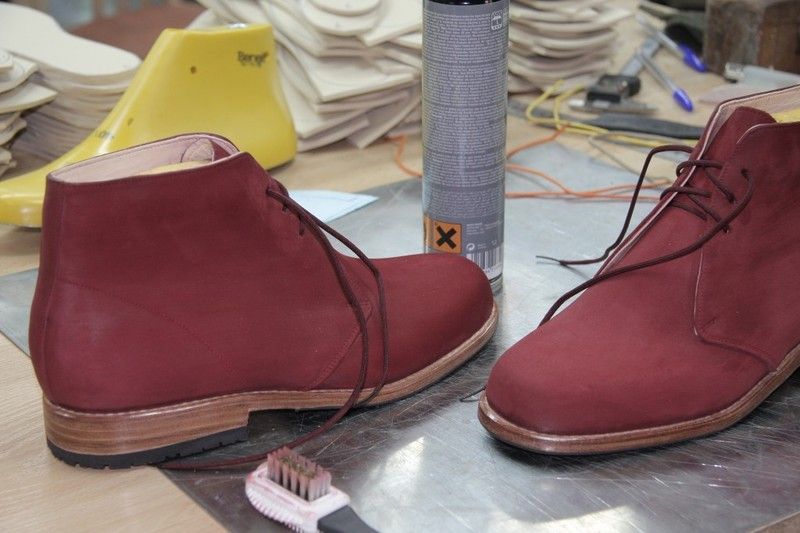
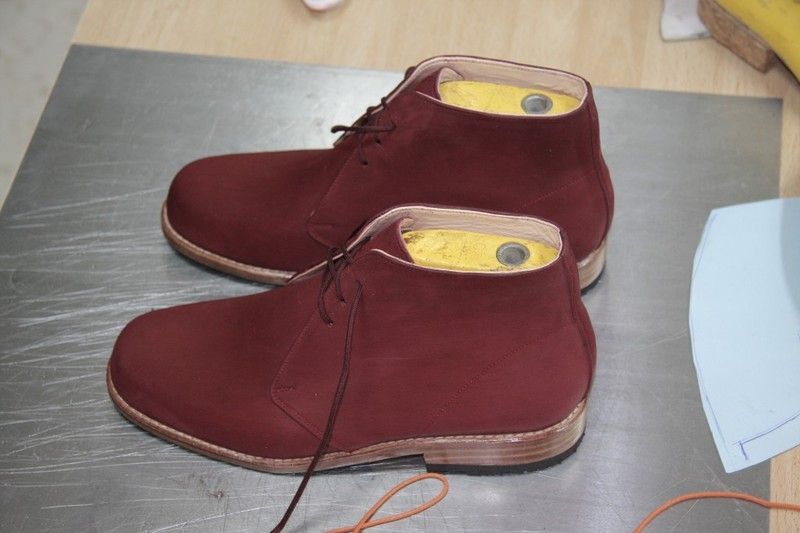
Posted: Fri Mar 18, 2016 8:06 am
by Manuel
Hi martin,
Nubuck is the leather I used, but I have all the videos and I'd like to konw if you want to upload their videos as have been made.
Thank you very much.
Re: The Gallery
Posted: Sun Mar 20, 2016 4:10 am
by martin
That would certainly be interesting to watch :-)
Re: The Gallery
Posted: Sun Mar 20, 2016 4:15 am
by martin
A pair of Kuhmaul or Tudor style shoes based on a find from Alpirsbach in Germany, likely from the 1520s (Fingerlin, Ilse. Textil- und Lederfunde. In: Alpirsbach. Zur Geschichte von Kloster und Stadt. Textband 2. Forschungen und Berichte der Bau- und Kunstdenkmalpflege Baden-Württemberg 10 (Stuttgart 2001) 715-817).
The shoe is typical for its type, an upper consisting of 2 pieces with a heel stiffener and a top band. A strap helps keeping the shoe firmly on the foot. The original was in heavy and likely long use, being repaired repeatedly.
The reconstruction you can see here is based on this find. The way the strap is attached differs from the original as does the width, mine is ca. 1cm narrower at the widest point. The insole decoration (2 slightly different types, don't ask ...) is taken from another 16th cent. shoe shown at the Deutsches Ledermuseum Offenbach. I made the pair with doubled soles front and back. The extra soles are sewn on with a double blind stitch as it was typically done at the time when adding extra soles to prolong the lifetime of the shoe.
Cheers,
Martin
Re: The Gallery
Posted: Sun Mar 20, 2016 6:10 am
by paul
Manuel, and Martin,
Thank you for sharing your work with us. You both are respected Craftsmen.
With Regards,
Paul
Re: The Gallery
Posted: Sun Mar 20, 2016 6:49 am
by dw
Martin,
Interesting! I like them.


