Page 17 of 31
Re: Bottoming techniques
Posted: Tue Mar 04, 2014 6:10 am
by homeboy
Dee-Dubb,
Can hardly wait!
Much appreciated!
Re: Bottoming techniques
Posted: Tue Mar 04, 2014 7:26 am
by lancepryor
DW:
Thanks, very interesting. I've used Hasluck's method before, and also have: whip-stitched the heel; used Marcel's approach (similar to Hasluck, but only uses a single thread); and have just continued sewing around the heel. Is there any particular reason why you don't just do the latter? One nice thing about it is the line of stitching stays parallel to the edge of the upper, so after sewing you can trim the upper more thoroughly/neatly, since there is no thread sitting on top of the inner part of the upper back there (though, in your pic, your upper is nice and flat, and thin, unlike many of my heels after lasting) .
Lance
Re: Bottoming techniques
Posted: Tue Mar 04, 2014 7:58 am
by dw
lancepryor wrote:DW:
Thanks, very interesting. I've used Hasluck's method before, and also have: whip-stitched the heel; used Marcel's approach (similar to Hasluck, but only uses a single thread); and have just continued sewing around the heel. Is there any particular reason why you don't just do the latter? One nice thing about it is the line of stitching stays parallel to the edge of the upper, so after sewing you can trim the upper more thoroughly/neatly, since there is no thread sitting on top of the inner part of the upper back there (though, in your pic, your upper is nice and flat, and thin, unlike many of my heels after lasting) .
Lance
Lance,
I don't know what Marcel's technique looks like, much less how to do it. You have a large advantage over me in that you have had some, more or less "formal," instruction from Terry(?) and others.
I know most of us...me, especially...would appreciate it if you would follow-up this photo essay with one of your own to describe how you (and Marcel) do it.
Re: Bottoming techniques
Posted: Tue Mar 04, 2014 8:34 am
by dw
Part the second...
So naturally, having made the hole we feed one bristle into the hole starting at the bottom of the channel and emerging on the upper. The effectively separates the two threads and as mentioned before, one becomes the "upper" thread and the other the "lower."
DSCF2671_2 (1024 x 768).jpg
Snug up the stitch...again, I beg pardon for the photos--the insole leather
is Baker but it is awfully dark.
DSCF2672 (1024 x 768).jpg
Another hole is then made...Hasluck recommends (and FWIW, I concur) that the holes be made at an angle. I actually try to start my hole directly opposite the last upper thread, angling to have the awl point emerge not too far from the edge of the upper and about 6-7mm from the last hole. All this can be adjusted to suit yourself but even using a tiger claw, if you hole the channel perpendicular to the channel you'll end up with stitches that are, in my opinion, to close to the outside of the shoe. Even this extreme awl doesn't have the ability to make sufficiently short holes/stitches.
DSCF2673 (1024 x 768).jpg
And now the "lower thread" is fed into the new hole starting, again, at the bottom of the channel and emerging on the surface of the upper. Now, we effectively have two "upper" threads--the initial one and the one just made.
DSCF2675 (1024 x 768).jpg
Don't tighten this "stitch" down. Not yet. In the photo you can see a loop being formed by the lower thread. This is important for the next step.
Don't go away folks, there's more...
Re: Bottoming techniques
Posted: Tue Mar 04, 2014 8:46 am
by lancepryor
DW:
Just for the record, I am not using Marcell's method -- I am currently just continuing the inseam stitch around the heel, the only difference being that there is no welt in that section of the shoe.
I will have to check my notes regarding Marcell's method, but, IIRC, it is similar to Hasluck. One difference from Hasluck is that you use the same thread for all the stitches. Also, IIRC, instead of sending the thread from the insole up through the awl hole, you thread it through the hole from the upper side and exit at the insole, then loop it behind the existing thread before pulling it tight (and hammering) -- if you've ever bound a pot roast or a pork loin with butcher's twine, it is sort of the same idea. Therefore, unlike in your example, the awl holes are made more or less perpendicular to the edge, rather than at an angle.
Lance
Re: Bottoming techniques
Posted: Tue Mar 04, 2014 9:03 am
by dw
lancepryor wrote:DW:
Just for the record, I am not using Marcell's method -- I am currently just continuing the inseam stitch around the heel, the only difference being that there is no welt in that section of the shoe.
I will have to check my notes regarding Marcell's method, but, IIRC, it is similar to Hasluck. One difference from Hasluck is that you use the same thread for all the stitches. Also, IIRC, instead of sending the thread from the insole up through the awl hole, you thread it through the hole from the upper side and exit at the insole, then loop it behind the existing thread before pulling it tight (and hammering) -- if you've ever bound a pot roast or a pork loin with butcher's twine, it is sort of the same idea. Therefore, unlike in your example, the awl holes are made more or less perpendicular to the edge, rather than at an angle.
Lance
Lance,
I think I see...probably a lot simpler than what I'm doing. As I mentioned this may be a bit idiosyncratic as I had to learn it from a book and at least one other highly knowledgeable member of the forum was, like myself, unable to make much sense out of Hasluck's description.
That said, the the two most important things I'm looking for is a solid stitch into the insole..a strong stitch, meaning you need to hole the insole deeply and for a sufficient distance to hold the stitch. I can't get that...reliably...holing from the top. And second, I very adamantly and deliberately want to keep the stitches as far away from the edge of the insole and the sides of the heel as possible. I worry that stitches out on the margin are potentially more vulnerable to damage and abrasion from dirt.
And having said that, I have seen shoes sewn in the way you are describing/doing. So I know it is a well established and respected technique. Just not my cuppa...
Re: Bottoming techniques
Posted: Tue Mar 04, 2014 6:43 pm
by dw
So...to reiterate, we now have two "upper" threads and a loop.
DSCF2676 (1024 x 768).jpg
The next step is to come up through the middle of the loop as in the next photo and grasp the initial upper thread, pulling it down and through the loop.
DSCF2678 (1024 x 768).jpg
In the next photo, the loop/stitch is being tightened and when it is tight we will again have one "upper" thread and one "lower" thread.
DSCF2679 (1024 x 768).jpg
Tighten down the stitch by pulling on the upper thread. The next photo shows two stitches having been made...for clarity.
DSCF2682 (1024 x 768).jpg
Repeat right around the heel and tie off.
DSCF2169 (1024 x 768).jpg
That's it! Hope this helps...
Re: Bottoming techniques
Posted: Tue Mar 04, 2014 6:50 pm
by dw
lancepryor wrote:DW:
(though, in your pic, your upper is nice and flat, and thin, unlike many of my heels after lasting) .
Lance
Lance,
I don't know if this next photo will help but it is a technique that I've been doing for over 40 years and yet I've never seen a shoemaker do it.
It's called "wiping the heel" and I also do it in the toe. Wiping has to be done with both downward and lengthwise tension.
DSCF2663cropped.jpg
Just an idea...
Re: Bottoming techniques
Posted: Tue Mar 04, 2014 8:00 pm
by lancepryor
DW:
Yes, I recall you posting a 'how to' some number of years ago on this topic. I definitely recall using the technique to last some toes, and I may have also done so for some heels. Perhaps I'll revisit that lesson and give it another try.
Thanks,
Lance
Re: Bottoming techniques
Posted: Thu Mar 06, 2014 3:09 pm
by lancepryor
Here is a (slightly fuzzy) picture of a heel seat I sewed today. As mentioned above, this was done with a continuation of the in seaming stitch around the heel seat, albeit holed with a more curved awl and the holes made from the upper-in, rather than the insole-out.
Lance
Re: Bottoming techniques
Posted: Thu Mar 06, 2014 4:43 pm
by homeboy
Hey Lance,
Now, will you sew on a split lift now (rand), or proceed to "bottom-out" the insole and attach the outsole.....followed with a sewn split lift?
I would like someone to post a pic of a sewn heel seat......the first lift sewn for the making of a heel.
Re: Bottoming techniques
Posted: Thu Mar 06, 2014 7:54 pm
by lancepryor
Hi Jake:
I will attach a rand, but I will do it with cement and pegs, not by sewing it.
I have seen a video of a maker who attached the sole at this point without a rand (using nails around the heel seat, rather than pegs), but that is not how I do it. I just use this stitch rather than the other options for sewing the upper to the insole around the heel. As I mentioned in my comment to DW, I have also seen it done with a whip-stitch, with Hasluck's approach, and in a way that is sort of an mid-point between Hasluck and a whip stitch (what Marcell does, I believe).
I would love to see a video or series of pictures showing the traditional sewn heel, like in the old books. I have tried to imagine how that works, with the heel stitches catching the stitches at the seat, and the folded and hammered rand (or is it the split lift, etc?), but I still don't really understand how that would work.
Lance
Re: Bottoming techniques
Posted: Thu Mar 06, 2014 9:30 pm
by homeboy
Thanks Lance! I wish Big Al would show us how it's done. I've never seen the sewn heel seat done to completion. I'm like you, I understand it, but just not quite sure how it would look afterwards.
Maybe Martha has a camera now?????

Re: Bottoming techniques
Posted: Thu Mar 06, 2014 10:54 pm
by brooklyn_edie
Thanks to all of you for this exchange. It's very informative. I will try all of these at some point.
However, next time I am gonna give Lance's option a try... for one specific reason. The last time I sewed the upper to the heel area, I used a whip stitch (it was my first time using this process). Though not the same process as in DW's example, it has a similar appearance when done - the threads end up 'kinda' parallel to each other as they hold the leather down flat against the insole. I found one drawback when the time came to sand the finish off of the leather to make it ready to take on the cement for sole attaching. It was rather difficult and laborious to have to sand between each individual stitch while avoiding sanding too much of the thread... it took forever, and I still wasn't sure if I sanded well enough. I don't remember enjoying that particular task and was concerned about damaging the thread. I'm hoping that when I try Lance's example, the sanding will come easier as the stitches form one straight line.
If there are any thoughts on that I'd love to read them.
Also, as per Jake's and Lances exchange... I did not know that a rand may be attached before the sole. I'd love to understand that better.
Again, thanks to all of you, and DW for starting the discussion.
Edie
Re: The Gallery
Posted: Fri Mar 07, 2014 3:31 am
by dmcharg
Thanks Jake,
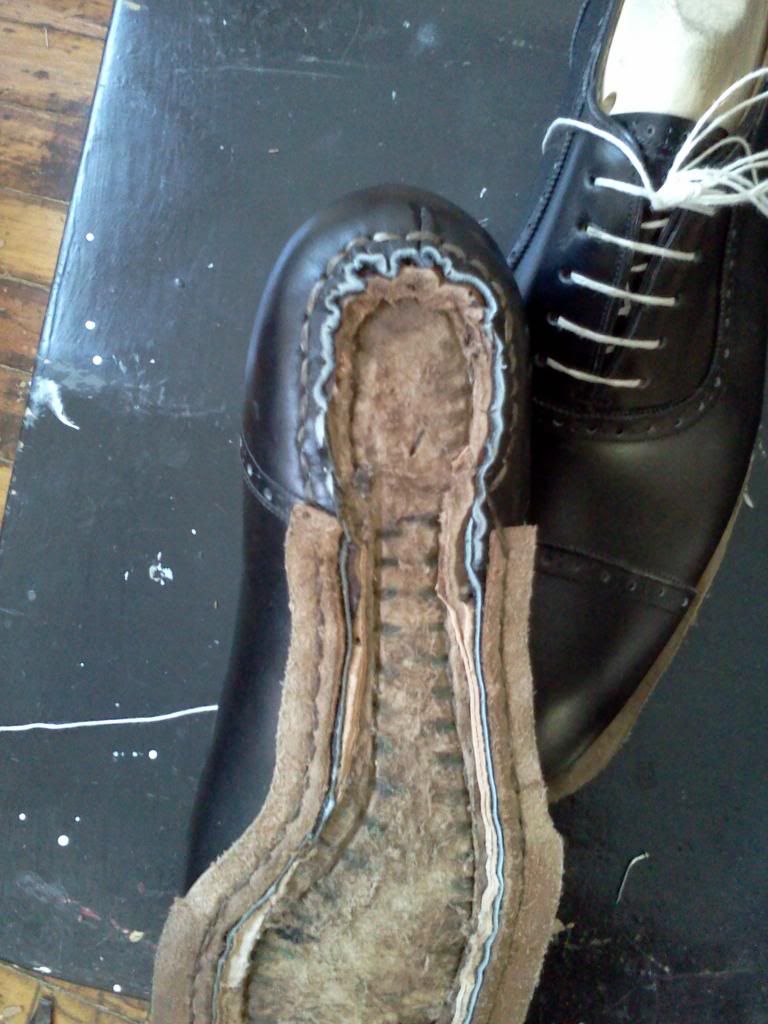
Years ago my dad bought me an original copy of Paul Hasluck's 'Bootmaking and Repair' 1895, and it covers this very secure way of attaching the heel. I don't know what sort of arm strength the old shoemakers had, but on a *good* day ( leather damp, dipping the awl in soap, and going at each hole 2 or 3 times ) I can only just get through the sole and 2 layers of heel. Didn't feel up to that at all this time, so just went through the sole. Here's a couple of pics of earlier work to give the general idea.
Bottom showing the inseam stitches which become anchor points for the sewn seat. (also showing the full leather shank and felt bottom filler)
complete transfer 126.jpg
Left hand stitches are the inseam; right hand stitches go behind those and down through the heel
Chriss's heel sewing 2.jpg
The threads ready to be 'snapped' home
Chriss's heel sewing 1.jpg
Re: The Gallery
Posted: Fri Mar 07, 2014 3:37 am
by dmcharg
Pt. 2
The rest of the heel lifts I attached with contact cement and solid brass wood screws before 'rounding up' and fixing on the rubber top lift
Chriss's heel 1.jpg
And from another pair, a good pic of the hammering up of the heel to hide the stitches
7.Heel before after.jpg
and of course my original post shows the finished results of this technique.
Hope it's been informative
Cheers
Duncan
Re: The Gallery
Posted: Fri Mar 07, 2014 5:21 am
by homeboy
Duncan,
Oh my gosh! Thank You! Just what the doctor ordered.
Believe I'll make a "go" of it on my next pair of work boots.
Once again, we all appreciate your expertise and contributions!
Adios, Jake
Re: Bottoming techniques
Posted: Fri Mar 07, 2014 8:03 pm
by dmcharg
Jake,
One last thing I forgot to include in my post.
I use two awls for this job; a blunt awl to initially open up the inseam stitch, followed by the sharp awl, carefully put through the gap thus made. No cut fibres that way. Also, if you hollow the heel while rounding up, it will make the layers move upward over the stitches when you hammer (quick drawing below)
Photo on 8-03-2014 at 2.11 06pm3.jpg
Just been hunting through my files. I filmed some of the heel sewing but it seems I've somehow deleted them


If I find them, I'll have to try and find out how to post them.
Cheers
Duncan
Re: Bottoming techniques
Posted: Sat Mar 08, 2014 5:17 am
by Arttu
I'm not sure if this is the right thread, but here goes. I've finished welting my first pair or shoes and looking into filler materials. I know many people here don't use cork as it degrades quite fast. Felt is one possibility, but I also have some 3-4mm thick chrome tanned elk/reindeer hide that is very soft. Would that be suitable as a filler material?
Re: Bottoming techniques
Posted: Sat Mar 08, 2014 6:29 am
by das
Arttu,
Best bottom filler IMO is thick tarred felt, but I'm not "allergic" to using cork (pre-cut 1/8" sheet, double layer). If you assume the outsoles will need replacing every year or two, you can stick in fresh cork when you resole. Nothing wrong with using leather filler either, just a matter of what you prefer.
Re: Bottoming techniques
Posted: Sat Mar 08, 2014 7:02 am
by dw
I have a little different take on all this...
First, it depends on your method of inseaming.
If you hand welt, you can often trim the inseam such that it doesn't need too very much at all in the way of bottom filler.
DSCF1564 (1024 x 768).jpg
Adding several layers of leather for a bottom filler is overkill if nothing else. We're just trying to bring everything up to level.
A single layer of the elk would probably be fine. The only real downside of that is you need to use all purpose cement or you'll get creaking.
Goodyear welting depends on cork because the inseam and gemming stands significantly proud of the insole and a fairly deep cavity is created that
must be filled. So many shoes are GY these days (it's the standard for RTW) that using cork has found its way into shoe repair shops and even among bespoke makers to some degree.
It is my experience, over many years of not just making but repairing boots and shoes, that cork (in whatever form) is fugitive under the foot. This is fine for low end insoles such as leatherboard which are not only thin but cannot make a footbed by themselves. But when the outsole is replaced, it is always the case that the insole has pushed the cork out from underneath. And replacing the cork is no longer a leveling process but a guess as to how much depth of cork should be over the high spots and how much in the low.
While I used leather for bottom filler for many years, I have since gone to felt. It is not fugitive and it can be installed with paste and even if the paste deteriorated there will be no creaking.

PS...on edit...echoing Al's remarks, I too would prefer tarred felt. I don't think it is available anymore, however. I even tried making my own by painting Stockholm tar on the felt. Never really firmed up. I came to the conclusion that dry felt...while not the first choice...was a good second. I bought a fairly large roll of pure wool felt from Sutherland Felt.
Re: Bottoming techniques
Posted: Sat Mar 08, 2014 9:30 am
by lancepryor
dw wrote:I have a little different take on all this...
First, it depends on your method of inseaming.
If you hand welt, you can often trim the inseam such that it doesn't need too very much at all in the way of bottom filler.
DW:
How thick is the insole you are using in that pic, and how deep is the outside of your holdfast cut? When I am in seaming, etc. there is no way I can get trim the welt, etc anywhere close to flat, except perhaps in the waist with its natural concavity.
I use the Bakers 8 - 9 iron insoles (let's say 12/64" = 3/16")), and cut the holdfast to a depth of perhaps half the insole thickness, ie. 3/32" deep, but let's say 4/32" = 1/8".
So, if I sew on the welt, upper, toe puff or side lining, and lining, that totals: 3/32" (welt) + 1.25 mm (upper) + 1 mm (side lining or toe puff) [ the latter is probably thicker than that] + 1 mm (lining) = 3/32" + 3.25mm = 3/32" + 1/8" = 7/32". So, if my holdfast is 1/8" deep, and the welt, etc, is 7/32" thick, there is no way that I can trim it flat without cutting through the in seaming stitch. Even granting a bit of compression of the leather (and I haven't included in my calculation the thickness of the thread itself), the total thickness of the leather is greater than the depth of the holdfast, probably on the order of 1/8."
dw wrote:PS...on edit...echoing Al's remarks, I too would prefer tarred felt. I don't think it is available anymore, however. I even tried making my own by painting Stockholm tar on the felt. Never really firmed up. I came to the conclusion that dry felt...while not the first choice...was a good second. I bought a fairly large roll of pure wool felt from Sutherland Felt.
What product (density or weight per square foot) did you order from Sutherland?
Did you ever try painting it with warmed/melted pitch? It would seem to me that if pitch is basically just thickened/reduced pine tar, that would work well, if it would soak in before setting up/hardening. Maybe have to cut the pitch a tiny bit with some pine tar or turpentine to make it a tiny bit more pliable?
Lance
Re: Bottoming techniques
Posted: Sat Mar 08, 2014 10:46 am
by dw
Lance,
It's true I prefer a little thicker insole--10-11 iron--but otherwise everything else is just about as you describe.
All my lasts have a bottom radius, so even before the feather itself is cut it is putatively lower than the soon-to-be level of the holdfast on the channel side.
I hammer and "iron" (rub) my inseams heavily. I trim close. But as you can see not dangerously close. Most of them come out looking very similar to what you see above regardless of the substance of the upper, etc..
As you can also see, looking closely, my inseams are not entirely level, either. To bring things up to level I need that 3/32" of the felt, although usually the felt ends up being just a smidge proud.
Sutherland Felt...248.280.0450. I think I talked to Phil (ext 22?). IIRC, I ordered F51 at 3/32" But I'm not sure that's not a "compressed" thickness, because looking at a couple pieces just now they look every bit of 1/8". That said, I'm not sure my eyes could see the difference...not anymore.
Warm pitch might be the ticket. I'll be watching for the results of your experiments in that direction.

I can see it in my mind and then I start thinking about how to mount it on the insole...???
Re: Bottoming techniques
Posted: Sat Mar 08, 2014 11:45 am
by dw
Lance,
You know this is kind of "straining at gnats" I guess, but when I envision an inseam I see the materials bulking outward more than upward.
It seems to me that theoretically one ought to be able to trim the inseam flush with the top surface of the holdfast and not hit the stitches.
I know there's a big difference in theory and reality but I more or less proceed on that basis/theory. Truth to tell, however, first time I trimmed that close it scared the daylights out of me.
Re: Bottoming techniques
Posted: Sun Mar 09, 2014 6:28 pm
by dmcharg
We own an old British car, and the sound deadening used is black tarred felt. You can get this at old vehicle supplies.
It tends to be stiff, so you heat it up (heat gun, hair dryer) to mould it. Just wondering if this might work?
Cheers
Duncan
