As a foreign exchange student in Finland in the 60's I had a pair of reindeer boots from Lapland that were made on that type last, right down to the turned up toes. They were straights but you could tell the feet apart because some colorful felt trim was on the lateral side. How do the parts of that wood last you've shown fit together? Can't tell as they are stung on the cord.
Georgene
Fitting the Foot
-
1947redhed
- 2

- Posts: 78
- Joined: Tue Jun 23, 2009 3:59 pm
- Full Name: Georgene Mckim
- Been Liked: 1 time
-
elizavt
- Posts: 6
- Joined: Tue Nov 16, 2010 6:23 pm
- Full Name: Eliza West
- Location: Vermont (At school in Nova Scotia), USA
Re: Fitting the Foot
Al and all,
I will head back to the belt-sander and narrow up the heel and take the curve off the back of the heel, (which will also shorten the last, moving the ball line a little further back on the foot. That will be fine because it's a little long anyway). Thank you for the advice. I was thinking that the heel was probably where the problem was coming from, but was having a hard time picturing how narrowing it was going to make the change I needed and I was reluctant to remove too much material without confirmation.
Thanks! Eliza
-
das
- Seanchaidh
- Posts: 1635
- Joined: Wed Apr 26, 2000 9:00 am
- Full Name: D.A. Saguto--HCC
- Has Liked: 149 times
- Been Liked: 136 times
Re: Fitting the Foot
Eliza,
Diagnosing last/fit issues from a photo is hard. If you flatten the heel-curve up the back, you can add a "heel pin" leather fitting to regain the lost last-length. Again, with straights, you must use the lateral heel-to-ball to design the bottom--not the medial.
Let's see what your changes do, tell us.
-
danfreeman
- 3

- Posts: 130
- Joined: Wed Mar 17, 2004 10:00 am
- Full Name: Dan Freeman
Re: Fitting the Foot
Al and all,
There's no doubt, well-made and properly fitted shoes do not gap or gape, now or centuries ago, when all shoes were handmade. But back then, so many shoes were made at home, or by part-time shoemakers, many no doubt did not reach such high standards--see Devlin's description of the common maid's slippers, shapeless after a few weeks wear, the uppers dragging on the ground.
Dan
-
dw

- Seanchaidh
- Posts: 5830
- Joined: Wed Jan 01, 1997 10:00 am
- Full Name: DWFII
- Location: Redmond, OR
- Has Liked: 204 times
- Been Liked: 122 times
- Contact:
Re: Fitting the Foot
All,
Well, here's a question that has been bugging the heck out of me...and I know I've asked it before without getting a definitive answer. But I'm really curious about how others approach this.
When fitting up a last do you make the instep/cone measurements/girths to the same measurements taken from the foot or do you make them slightly under?
When making an oxford, the shoe seems to look better and last better if the instep girths on the lasts are made some little bit under the actual foot measurements.
This allows the facings to be laced tight for lasting and this results in a very nice looking shoe with the facings as near straight as it may be possible to achieve. Yet when the shoe is worn the facings will not close up entirely--a situation which, in most cases, would be undesirable.
I realize that much of this depends on how and where the foot is measured but I am wondering if there is some rule of thumb? or if anyone has any insights to impart.
Tight Stitches
DWFII--HCC Member
-
lancepryor
- 7

- Posts: 662
- Joined: Wed Mar 31, 2004 6:42 am
- Full Name: lance pryor
- Been Liked: 3 times
-
romango

- 8

- Posts: 854
- Joined: Wed Apr 18, 2007 1:40 pm
- Full Name: Rick Roman
- Location: Eugene, Oregon, USA
- Been Liked: 8 times
- Contact:
Re: Fitting the Foot
I allow for ~ 1/4" opening at the top. If this closes all the way, over time, that is not necessarily a problem, as long as it is not slack.
-
dw
- Seanchaidh
- Posts: 5830
- Joined: Wed Jan 01, 1997 10:00 am
- Full Name: DWFII
- Location: Redmond, OR
- Has Liked: 204 times
- Been Liked: 122 times
- Contact:
Re: Fitting the Foot
Lance,
Thank you that's along the lines I was looking for.
Does he do the same thing on derbys? And/or ankle boots?
Rick,
I try to allow the same amount. But what I'm talking about is how do you fit up the last to get that 1/4"? If you fit it up to the foot measurements, it will close up and in not too long a time unless you last the shoe with that same 1/4" gap. But if you do that, then the edge of the facings can take on a subtle curve during lasting or get out of alignment.
I made a pair of whole cuts where, even though I had cut the facings straight, when the shoes were finished the facings were curved away from each other--granted they were 1/4" at the top of the facings but still curved. It's not a good look.
Tight Stitches
DWFII--HCC Member
-
romango
- 8
- Posts: 854
- Joined: Wed Apr 18, 2007 1:40 pm
- Full Name: Rick Roman
- Location: Eugene, Oregon, USA
- Been Liked: 8 times
- Contact:
Re: Fitting the Foot
DW,
I have seen that curving effect.
I think the fiberglass reinforcement tape I use in the facing helps prevent distortion at that point. Also, using a tape form helps match the pattern to the last better, in some cases, than a geometric pattern.
I have seen that curving effect.
I think the fiberglass reinforcement tape I use in the facing helps prevent distortion at that point. Also, using a tape form helps match the pattern to the last better, in some cases, than a geometric pattern.
-
lancepryor
- 7
- Posts: 662
- Joined: Wed Mar 31, 2004 6:42 am
- Full Name: lance pryor
- Been Liked: 3 times
Re: Fitting the Foot
DW:
I think he uses the same last for all 3 types you've enumerated. Of course, for an open-faced shoe like a derby, there is a separate decision as to how far apart the facings should be on the pattern, so I guess you might want to account for the 1/4" shortfall of the last when doing the pattern. On a boot with a closed facing, like a balmoral boot, I don't know what Terry would do, perhaps add the 1/4" back with a shover? I don't think one would want a 1/4" gap at that point in a bal boot, but what do I know.
Also, on a boot, don't forget the back curve needs to be different above the counter point, not clipped in but rather a bit away from the last (probably obvious, given your background in boot making).
BTW, greetings from Budapest!
Lance
-
athan_chilton
- 4

- Posts: 163
- Joined: Sun May 17, 2009 7:03 am
- Full Name: Athan Chilton
- Location: Urbana, IL, USA
-
last_maker
Re: Fitting the Foot
Al,
Your last knowlege and ability to explain it,never ceases to amaze me!
Marlietta
Lastmakingschool.com
Your last knowlege and ability to explain it,never ceases to amaze me!
Marlietta
Lastmakingschool.com
-
das
- Seanchaidh
- Posts: 1635
- Joined: Wed Apr 26, 2000 9:00 am
- Full Name: D.A. Saguto--HCC
- Has Liked: 149 times
- Been Liked: 136 times
Re: Fitting the Foot
Marlietta,
Thanks. If I ever make it into the 21st c. with digital cameras, and learn how to draw on a computer I'll hopefully get even better. Gad to laugh--several years back I was doing last-design consulting for one of the "Big Three" US companies, and going round and round in e-mail with no results over some details. In the end I said, "just let me make you a last to express what I've been trying to describe..." That worked even better than words.
Thanks. If I ever make it into the 21st c. with digital cameras, and learn how to draw on a computer I'll hopefully get even better. Gad to laugh--several years back I was doing last-design consulting for one of the "Big Three" US companies, and going round and round in e-mail with no results over some details. In the end I said, "just let me make you a last to express what I've been trying to describe..." That worked even better than words.
-
last_maker
Re: Fitting the Foot
In march Nori posted a note about boiled wool slippers and desire to utilize her own foot as a last. She proceeded to cast her foot.
I wanted to make a comment about this. A bit late, true, but simply wanted to put it out there.
i wanted to say that in the fiber arts industry, this is a common practice to use the foot as a last instead of a usual last as many of are accustomed to. The results are often met with a "granola" aethetics, however, I belive both Christine clark's book "make it your self shoe book ( amazon.com) and Sharon Raymonds' first "how to" book on shoe making both discribe utilizing the live foot as a last, but Have mostly over come the clunky 'granola' effect of unlasted shoes. Also, many of the methods that christine discribe for construction is not of a lasted shoe but a sewn shoe with out a last at all. Once again, as is often practiced in the fiber arts and crafts segment that slippers and no heeled shoes are constructed with out a last or utilize a live foot as the last for fitting and pattern making.
If you log into a yahoo group called "Knittingmachines" you and do a search on that list for "knitted clogs" you will come up with many unlasted constructed shoes.
Now being a lastmaker myself, I am not advocating that we all go out and make shoes with out lasts. I belive the lasts afords us control over the shape and design of an artical of footwear, as well as control over the foot wears engineering and by this perspective, I promote utilizing a last for a professional shaped finish. However, I have seen really good results in shoe making, made with out a last or a foot utilized as a last as long as the footwear is completely flat with a flexible sole.
-Marlietta
Lastmakingschool.com
-
elfn
- 3
- Posts: 132
- Joined: Tue Mar 01, 2011 10:00 am
- Full Name: Nori Lamphere
- Location: Onalaska, WA, USA
- Contact:
Re: Fitting the Foot
I have now made shoes both ways. The stitched down shoes with no lasts were very comfortable. I wore them until the soles out. They were probably the first shoe I ever wore that allowed all the bones in my feet to flex and stretch as nature intends. I will resole them with something a little more durable and continue to wear them in the winter. I may modify them to include an external shaper with waterproofing so my feet don't get wet if I dash from the house to the shop in bad weather.
Now that I'm making lasted shoes I can see there are benefits attached to having a solid structure to build around. My goal is a shoe that is light and flexible, designed and constructed to allow my feet to retain their health and strength. Somehow I have to find the line where the structure of the lasted shoe meets the flexibility and freedom of the stitched down shoe.
I'm getting there. It's a learning process.
Nori
-
last_maker
Re: Fitting the Foot
I think that if you are making flat shoes, your best bet is flexible soles.
You go ahead and build your footwear around a last but follow constuction styles similar to how tango shoes are made. Rick Roman would be a good one to speak of this method of construction. I understand tango shoes need flexible soles for dancing. but the key here is if you want all your bones to flex and move naturally, and not bind them in an arch support or anthing of the sorts,than keep the soles flat and flexible. you can get flexible soling materails at many leather finding store or if you don't mind a plane sole, you can pour out some polyurethane rubber onto a table covered in wax paper and let it harden. Once hardened,cut it out the shape of your sole and glue it onto the bottom of your shoe you are making. You can do this with any style from a heeless pump to a low, very low boot can be constructed this way, either with a premade flexible soling material or you can make your own, but flexible is key. other than that many footwear styles can be achieved.
Just remember, keds tennis shoes are completly flat and flexible. Some find them stylish and comfortable. I buy them way oversized and use them as slippers.
-Marlietta
lastmakingschool.com
-
elfn
- 3
- Posts: 132
- Joined: Tue Mar 01, 2011 10:00 am
- Full Name: Nori Lamphere
- Location: Onalaska, WA, USA
- Contact:
Re: Fitting the Foot
I agree, flexibility is key. And, for me, flat is as important. I'm using a Vibram sole that I like really well. It's grippy and flexible. Here's a picture of the Vibram sole, as I know they make a wide variety.
I've got it on three pair of shoes so far, a stitch down (the clog top pictured) and my first and second pair of fitters.
My first pair of fitters are comfortable (pig lining with boiled wool outer), but the ankle opening is too big and the shoes won't stay on for anything but walking quietly. They look nice but aren't very functional.
My second pair of fitters (no picture) are better but the shoe is still a little sloppy in fit. Part of that is my failure to get the upper stretched tightly onto the last. I can't make any additional adjustments to the last until I do a proper job of lasting.
Nori
You do not have the required permissions to view the files attached to this post.
-
last_maker
Re: Fitting the Foot
Nice!
If you want to pull away from a wide look even though your feet are wide, it is ok to elongate the toes. If you draft a tracing of the profile of your foot and divide this tracing up by five at the heel making the floor line plane 1 and the top of your ankle bone plane five. Then divide plane one in half from plane five and make that plane 3. then divide plane one and three in half and make that plane 2. Then you can divide plane five and three in half and make that plane 4. Pic a plane to begin at from the heel and draw a line to the floor line at the toes. Note how a draft line from plane five gives you little toe room but drafting from plane 2 gives a more elongated toe but more joint room. It is up to you how long you want the toe box to be. the sharper the toe box the longer it must be to fit your toes, the rounder the toe box, the less length your toe box must be. However, this is always the conundrum of my students. How long is too long before I trip over my feet and how short is to short before I compromise aethetics??? A rule of thumb is always a size or two past your longest toe but for wide feet this can not always be the case because you are trying to balance the width with the length. In shoe making thirds are key to beauty and balance. So for your feet you could measure the width across and devide that maeasurement by three and elongate 1/3 the width from the longest toe and see how that looks to you. With this information you can transfer it to your sole shape for how much longer the sole shape needs to be from your longest toe. Some who are making Orthopedic shoes, do not take this into account and comprimise aethetics over function and this in absolutly not necessary. Also you could try to swing the peak of the top of the shoe more in center or at least towards the center of the inbetween your first and second toe if not over your second toe even though the top of your foot continues to point to your first toe. By making the peak of the toe box over the second toe if not inbetween the first and second will bring more balance in aethetics to your footwear and less like a foot.
Just a thought,
Marlietta
Lastmakingschool.com
-
elfn
- 3
- Posts: 132
- Joined: Tue Mar 01, 2011 10:00 am
- Full Name: Nori Lamphere
- Location: Onalaska, WA, USA
- Contact:
Re: Fitting the Foot
Thanks Marlietta. I really do appreciate your thoughts, knowledge and experience.
At least for now, I want to keep my shoes as close to the shape of my feet as I can for two reasons. I have been known to trip when wearing a longer toed shoe. We live "in the rough" and sometimes I have to hare off into regions where the grass isn't manicured and long toes are a detriment.
Pair that with a slowly healing ingrown toenail and I'm going to put off changing the shape for now. Moving the point of the shoe toward the middle toe would decrease the available space for my big toes. <wince>
I know my shoes look like feet. I'm okay with that. Comfort trumps looks for me. Remember, I'm the woman who wore wool felted things everywhere (even to town) until I wore the bottoms out. <grin> Vanity isn't an issue when it comes to foot comfort. I spent enough of my life with feet that hurt. Now I'm retired and I can afford to just be me in comfort.
Nori
-
luke_miller
- Posts: 5
- Joined: Mon Jun 27, 2011 10:06 pm
- Full Name: luke miller
- Location: Salt Lake CIty, Utah, USA
Re: Fitting the Foot
Hello All,
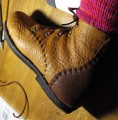
I've been lurking for a long time and its finally time to ask a question. The boot pictured fits very well except that it sits painfully tight against my inner ankle bone and less painfully against my outer ankle bone. This boot is essentially a second fitter because the toe and heel didn't have enough allowance (barely, sigh). Also, there were many mistakes made, most notably using water based dye for the lining. Hence the red last. My questions are: Do I (how do I) alter my last to allow room for my ankle bone, or is there some "trick" to keep the line of the boot/last nice yet allow room? Does anyone have any better ideas for attaching the tongue in a water shedding fashion? I am going to go with one piece lining next go around. Also you can see on my last and in the boot that I built on a bit to the back top of the ankle area which didn't work because the last is too short to affect the top line which is a little forward at this point. Would my new idea of allowing a bit more leather into the pattern at that spot give me more (1/4" more) "leg room" when my toe is extended?
Thank you for your time and responses. Of course any comments are welcome as this is my second pair and I need all the feedback I can get.
Luke Miller
Salt Lake City
-
luke_miller
- Posts: 5
- Joined: Mon Jun 27, 2011 10:06 pm
- Full Name: luke miller
- Location: Salt Lake CIty, Utah, USA
Re: Fitting the Foot
Hello All,
I've been lurking for a long time and its finally time to ask a question. The boot pictured fits very well except that it sits painfully tight against my inner ankle bone and less painfully against my outer ankle bone. This boot is essentially a second fitter because the toe and heel didn't have enough allowance (barely, sigh). Also, there were many mistakes made, most notably using water based dye for the lining. Hence the red last. My questions are: Do I (how do I) alter my last to allow room for my ankle bone, or is there some "trick" to keep the line of the boot/last nice yet allow room? Does anyone have any better looking ideas for attaching the bellow tongue in a water shedding fashion? I am going to go with one piece lining next go around. Also you can see on my last and in the boot that I built on a bit to the back top of the ankle area which didn't work because the last is too short to affect the top line which is a little forward at this point. Would my new idea of allowing a bit more leather into the pattern at that spot give me more (1/4" more) "leg room" when my toe is pointed?
Boot is made from 7/8 oz shoulder (will use 7/8 side for next try), chrome goat tongue and veg goat lining. The counter or heel stiffener is approx. 6 oz. veg shoulder and covers the problem ankle area. Have I carried it to high? There is no toe stiffener because I didn't have enough toe allowance this time. Koleff last making and shoe design. Tim Skyrme and HCC on construction. Beyond the fit of the ankle, my biggest issue to fix is the look of the tongue/lining sewing. The upper leather is poor quality, I was learning to dye, and I stretched the h*** out of it. I feel sure I will get a better look this time.
Thank you for your time and responses. Of course Any comments are welcome. This is my second pair and I need all the feedback I can get.
Luke Miller
Salt Lake City
You do not have the required permissions to view the files attached to this post.
-
kemosabi
- 5

- Posts: 250
- Joined: Thu Jan 20, 2011 4:03 pm
- Full Name: Nat Ledbetter
- Location: Tennessee, USA
- Been Liked: 1 time
Re: Fitting the Foot
Hi Luke,
I normally leave these kind of questions to the experts, but I see you haven't gotten any responses yet, so here goes and maybe the experts will jump in too.
Sounds like the heel stiffener you added is causing the problem. The boot designs I've seen don't have the heel stiffener covering the ankle area. So; Yes... I would say you carried the stiffener too high.
You may eventually get the boot to "break-in" around your ankle, but at the thickness you're using (7/8 oz, plus a 6oz stiffener), sounds like your ankle will break in before the leather!
You may consider using thinner leather... 4/5oz maybe and 6/7oz for the stiffener. I've built boots from 3/4oz and was surprised how tough and durable they were.
Stiffeners should only be added at the areas of the foot that don't bend. Count on the leather to flex around your ankle, not modify the last to fit your ankle, unless you're trying to make a boot that isolates (holds firm) your ankle, such as an ice skate boot for instance. In other words, I don't see any problem with your last, at least for the type boot your building.
My 2 cents worth anyway.
Good luck, and overall not a bad lookin' boot in my opinion.
Regards,
-Nat
-
luke_miller
- Posts: 5
- Joined: Mon Jun 27, 2011 10:06 pm
- Full Name: luke miller
- Location: Salt Lake CIty, Utah, USA
Re: Fitting the Foot
Nat,
Thank you very much for your response. I have searched and read for dozens of hours looking for the simple info you have graciously given. I should have asked questions sooner!
I think I'll follow your advice and go with the thinner leather (I have some on hand from another project). My original fitter was 4/5 oz. and fit like a dream as well as being a whole lot easier to last. I guess I just needed the approval of someone who knows to say I didn't have to go the heavy leather direction. I'm still learning to listen to that little voice.
To all,
I am still very open to suggetions or comments as I have a lot to learn and this is "the" place to do it.
-
artzend
- 7
- Posts: 519
- Joined: Sat Feb 10, 2007 10:00 am
- Full Name: Tim Skyrme
- Location: Agnes Water, Queensland, Australia
- Been Liked: 2 times
- Contact:
Re: Fitting the Foot
Luke
I would like to see your standard, if you are having to pull hard to get the upper on the last then there is a problem. It looks as though the upper is pulled in at the top of the last, you may need to allow a bit more room there.
In a boot the stiffener does not come as high as it does in a shoe, if the stiffener is the problem you can soften it with water if it's leather and bend it away from your foot. Try using bunion pliers if you have them.
Also, add some more leather to the top of the toe build up where it joins the last and re sand it. That edge will show up on the upper when lasting, it just needs to be blended in better.
You can always put foam between the upper and lining in the ankle area too.
Tim
-
tjburr
- 5
- Posts: 260
- Joined: Sat Sep 19, 2009 9:00 am
- Full Name: Terry Burress
- Location: Fort Worth, Texas, USA
- Has Liked: 1 time
- Been Liked: 8 times
Re: Fitting the Foot
Luke,
I am not sure I can add much,but l did have a few questions.
Is this pattern made from the koleff books?
If so, I have actually made a boot from the patern.
Being a one piece design it seemed to be fairly sensitive to measurements. So double check them. Also make sure the heel height is correct.
Also Tim has some suggested mods to the koleff patterns,and one of these develops a much better transition between the forefoot and ankle for the short boot pattern. This might help in this area since I noticed a much better fit in the ankles after that. Look on his website,a quick search here should find the address.
If you wish,and you can verify you own the koleff book, I have this particular pattern set up in a pattern generation program. If you send me measurements I can run the prrogram and generate a pdf of the standard from page 126. You can then print it out and compare with your design to make sure the calculations are correct with your current pattern.
Also did you develop your own last? Just curious due to the shape. From doing plaster casts and countless unlasted shoes, I am not sure I would expect as much inword curve on the front of the last. I often see this shape on foot tracings but when making the patern for the shoe I usually make an adjustment in this area. Others more knowledgeble in lasts will hopefuly speak up. I am only typing from my phone tonight, so I can not draw a picture, but you might search for something like treadline on this site. If I remember, if you draw a line across the ball of the foot, and divide this line in two. Then you draw a line through the cen ter of the heel and extend it through the point on the ball line out the front of the foot, it should cross somewhere on your second toe or between the second and third toe. HELP someond who knows more if I am leading this way wrong since this is not my field. If this does not result, I usually rotate the ball/toe area of the pattern slightly. I am not sure this is very sientific but some people just have a vastly different footshape when out if the shoe vs in the shoe. I also trace the foot with and without weight on the foot and in these cases you usually see a similar difference in these two tracings. If I do not see this in difference in the two tracings, with both having strange treadlines, I start getting concerned about the proper pattern and start looking at wear patterns on their shoes.
So with the unlasted shoes, if I go purely off the tracing, I find people have a tendancy to want to torque the shoe relative to the sole and rub on the inside or outside, depending on the persons gait, of the heel. With 7 oz veb tan (if I understand this is what leather you used) this may cause pressure and be uncomfortable. Since lasted shoes is not my expertise I hope someone more knowledgeable speaks up and lets me know if I am leading you astray.
I have only made one boot in this style and the plaster cast for the last had toe issues, but I hiked in them for 2 years. They were made of 6oz oil tan leather which made them practically indistructable but though the toe looked awful they were very comfortable.
Terry